Introduction
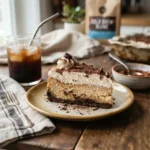
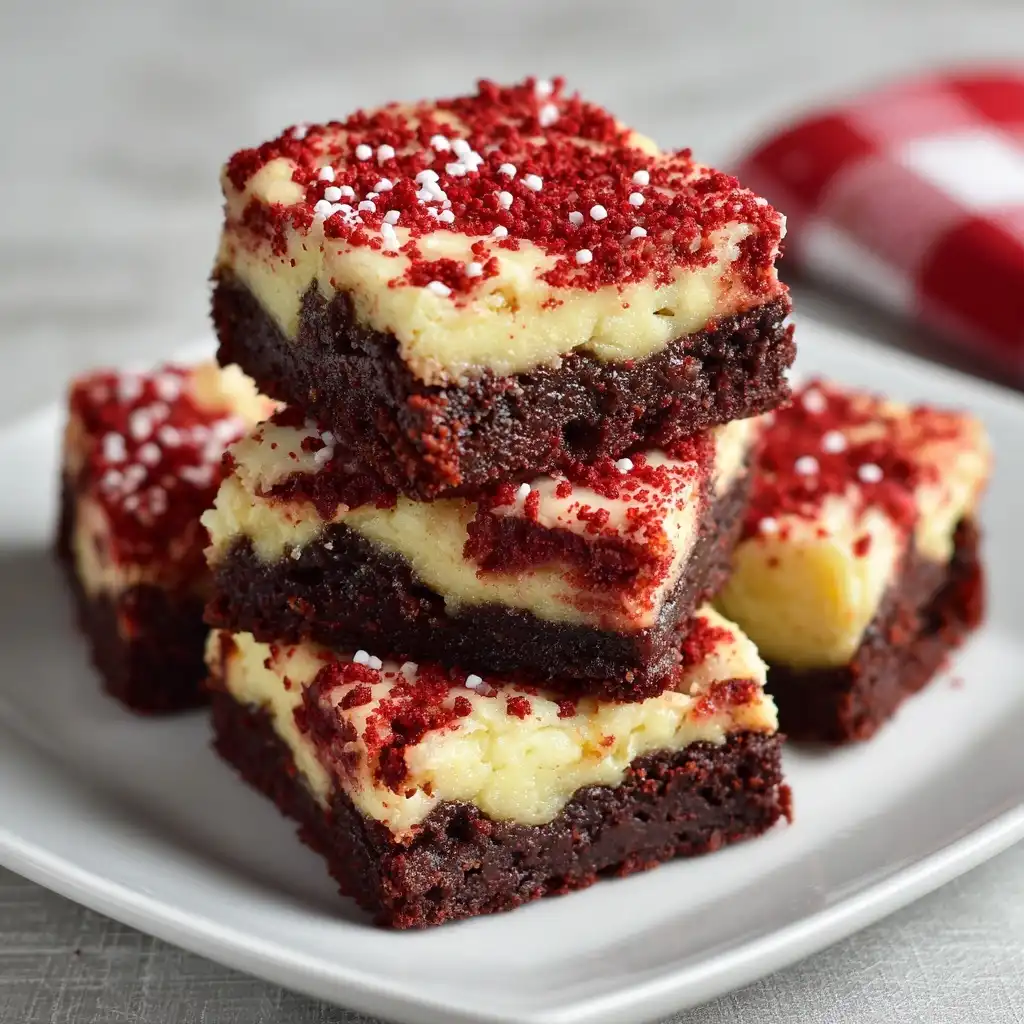
Red Velvet Cheesecake Brownies are the ultimate decadent dessert fusion—a rich, velvety marriage of three beloved treats: classic fudgy brownies, creamy New York–style cheesecake, and the iconic crimson allure of red velvet cake. With their striking marbled swirls, tender crumb, subtle cocoa tang, and luxuriously tangy-sweet cream cheese layer, these brownies deliver an unforgettable textural and flavor experience in every bite. Whether served at holiday gatherings, bridal showers, birthday parties, or simply as a weekend indulgence, they consistently steal the spotlight—elegant enough for special occasions yet approachable enough for home bakers of all skill levels.
The History
The origins of Red Velvet Cheesecake Brownies lie at the intersection of two iconic American desserts with deep culinary roots. Red velvet cake traces its beginnings to the early 20th century, gaining popularity in the Southern United States—particularly through the Waldorf Astoria Hotel’s legendary (though historically debated) recipe in the 1940s. Its signature red hue was originally derived from the natural anthocyanin reaction between acidic ingredients (like buttermilk and vinegar) and non-Dutched cocoa, later enhanced by food coloring for visual drama. Cheesecake boasts ancient lineage—from Greek honey-sweetened cheese tarts served at Olympic games—to modern American baked versions popularized by New York delis in the mid-1900s. Brownies emerged in the late 1800s as a happy accident of “overbaked cake,” evolving into dense, fudgy, or cakey staples by the 1920s. The fusion into Red Velvet Cheesecake Brownies likely began circulating widely in the early 2000s via food blogs and Pinterest, gaining viral traction around 2012–2015 as bakers experimented with layered, swirled, and hybrid desserts. Today, it stands as a testament to American dessert innovation—blending nostalgia, visual appeal, and sophisticated balance between richness and acidity.
Ingredients Breakdown
Understanding each component is key to mastering this multi-layered dessert. The recipe features three distinct yet harmonious layers: the red velvet brownie base, the creamy cheesecake swirl, and the optional—but highly recommended—red velvet crumb topping.
- Red Velvet Brownie Base: All-purpose flour provides structure; granulated and brown sugars contribute sweetness, moisture, and caramel notes; unsalted butter delivers richness and tenderness; large eggs bind and add lift; high-quality unsweetened cocoa powder (natural, not Dutch-process) ensures proper acid reactivity for both color development and flavor depth; red food coloring (liquid, gel, or powdered) intensifies the signature hue without compromising texture; white vinegar and buttermilk create gentle leavening and enhance the cocoa’s natural red tones; pure vanilla extract adds aromatic warmth; and fine sea salt balances sweetness and heightens complexity.
- Cheesecake Swirl: Full-fat brick-style cream cheese (at room temperature) forms the luscious, tangy core—never substitute with low-fat or whipped varieties, as they lack stability and richness. Granulated sugar ensures smooth integration and prevents graininess; sour cream adds subtle tang and moisture while improving sliceability; one large egg binds without making the layer rubbery; pure vanilla extract complements the red velvet base; and a pinch of salt refines the overall flavor profile.
- Optional Red Velvet Crumb Topping: A small portion of the red velvet batter reserved before baking is sprinkled on top pre-bake, creating delicate, crisp-red velvet “nuggets” that contrast beautifully with the creamy swirl and fudgy base—adding visual drama, textural intrigue, and intensified red velvet flavor in every bite.
Pro Tip: For optimal results, use gel-based red food coloring (like AmeriColor or Chefmaster) instead of liquid—gel delivers vibrant color with minimal added moisture, preventing batter thinning and ensuring consistent swirl definition.
Step-by-Step Recipe
- Prep & Preheat: Position oven rack to center position. Preheat oven to 325°F (163°C). Line a 9×13-inch metal baking pan with parchment paper, leaving 2-inch overhang on two opposite sides for easy lifting. Lightly grease the parchment and pan edges.
- Make Red Velvet Brownie Batter: In a medium bowl, whisk together 1¾ cups all-purpose flour, ¾ cup unsweetened natural cocoa powder, 1 tsp fine sea salt, and 1 tsp baking powder. In a large heatproof bowl, melt 1 cup (2 sticks) unsalted butter; let cool 2 minutes. Whisk in 1¾ cups granulated sugar and 1 cup packed light brown sugar until glossy (~1 min). Add 4 large eggs, one at a time, whisking vigorously after each until fully incorporated and slightly thickened. Whisk in 2 tsp pure vanilla extract. Sift dry ingredients over wet mixture in two additions, folding gently with a silicone spatula just until no streaks remain. Stir in 1 tbsp white vinegar and ½ cup cold buttermilk until just combined. Finally, stir in 2 tbsp (or more, to desired intensity) red gel food coloring until uniformly deep red—do not overmix.
- Portion & Reserve: Pour ~⅔ of the red velvet batter (approx. 3¼ cups) into the prepared pan, spreading evenly with an offset spatula. Smooth surface. Reserve remaining batter (~1¼ cups) in a small bowl—this will become the crumb topping. Set aside.
- Prepare Cheesecake Swirl: In a clean medium bowl, beat 16 oz (2 full blocks) full-fat cream cheese with an electric mixer on medium until completely smooth and creamy (~1 min). Add ¾ cup granulated sugar and beat until light and fluffy (~1½ min). Beat in ½ cup full-fat sour cream until fully incorporated. Add 1 large egg and beat on low just until blended—do not overbeat. Stir in 1 tsp vanilla and ¼ tsp salt. Transfer to a piping bag fitted with a wide round tip (or use a zip-top bag with corner snipped).
- Swirl & Top: Pipe or spoon dollops of cheesecake batter evenly over the red velvet base. Using a butter knife or thin skewer, gently drag through the layers in a figure-eight or zigzag motion to create elegant marbling—avoid over-swirling, which causes blending and loss of contrast. Immediately spoon small scoops (½-teaspoon size) of the reserved red velvet batter over the surface. Gently press each scoop *slightly* into the cheesecake layer with the back of a spoon—this helps them adhere and bake into delicate, chewy-red velvet crumbles.
- Bake with Precision: Bake at 325°F for 48–55 minutes. The brownies are done when the edges are set and lightly pulling away from the pan, the center jiggles *just slightly* (like firm Jell-O) when gently nudged, and a toothpick inserted 1 inch from the edge comes out with moist crumbs—not wet batter. Crucially, avoid overbaking—the cheesecake layer continues to set as it cools.
- Cool & Chill: Cool completely in pan on a wire rack (minimum 2 hours). For cleanest cuts and optimal texture, refrigerate uncovered for at least 4 hours—or preferably overnight. This firms the cheesecake layer, enhances flavor melding, and prevents crumbling.
- Cut & Serve: Use parchment overhang to lift brownies from pan. Place on cutting board. With a sharp, hot knife (dipped in hot water and wiped dry between cuts), slice into 16 even 3×3-inch squares—or 24 smaller bars. Wipe knife thoroughly before each cut for pristine edges.
Tips
- Room Temperature Is Non-Negotiable: Cream cheese, eggs, and sour cream must be at true room temperature (68–72°F)—cold ingredients cause lumps, uneven mixing, and poor emulsification, leading to cracked or curdled swirls.
- Butter Matters: Use high-quality unsalted butter with ≥82% fat content. European-style butters (like Kerrygold or Plugrá) yield superior richness and depth.
- Measure Flour Correctly: Spoon flour into measuring cup and level with a straight edge—never scoop directly from the bag, which compacts flour and leads to dry, dense brownies.
- Don’t Overmix Batter: Once dry ingredients are added, fold *just until combined*. Overmixing develops gluten, resulting in tough, cakey texture instead of fudgy tenderness.
- Swirl with Intention: Less is more. 8–10 gentle passes with your knife creates ideal contrast. Too many swirls = grayish, homogenous layer.
- Chill Before Cutting Is Essential: Skipping refrigeration guarantees smearing, crumbling, and loss of defined layers. Overnight chilling yields professional-grade slices.
- Knife Technique: Use a long, thin chef’s knife or serrated knife. Heat under hot tap water, wipe completely dry, then cut. Repeat for every slice.
- Storage Wisdom: Store covered in refrigerator for up to 1 week. Freeze unfrosted bars (individually wrapped in plastic + placed in airtight container) for up to 3 months. Thaw overnight in fridge before serving.
Variations and Customizations
This versatile recipe invites creative expression while maintaining structural integrity and balanced flavor:
- Gluten-Free Version: Substitute red velvet base flour with a 1:1 gluten-free baking blend containing xanthan gum (like King Arthur or Bob’s Red Mill). Increase baking powder to 1¼ tsp and add 1 extra tbsp buttermilk to maintain moisture. Verify all other ingredients (cocoa, food coloring, baking powder) are certified GF.
- Vegan Adaptation: Replace butter with refined coconut oil or vegan butter; use flax eggs (4 tbsp ground flax + 10 tbsp water, rested 10 min); swap cream cheese and sour cream for high-fat, plain vegan alternatives (Kite Hill or Miyoko’s); use plant-based buttermilk (1 cup unsweetened almond milk + 1 tbsp apple cider vinegar); and ensure red coloring is vegan-certified (many gels are).
- Decadent Upgrades: Fold 1 cup chopped toasted walnuts or pecans into the red velvet base. Drizzle cooled brownies with white chocolate ganache or cream cheese glaze. Sprinkle with crushed freeze-dried raspberries for tart contrast and jewel-toned speckles.
- Miniature Format: Bake in a lined 24-cup standard muffin tin. Reduce bake time to 22–26 minutes. Yield: 24 mini brownies—ideal for parties or portion-controlled treats.
- Boozy Twist: Add 2 tbsp high-quality bourbon or amaretto to the red velvet batter for warm, complex notes. Reduce buttermilk by 1 tbsp to compensate.
- Lower-Sugar Option: Replace ½ cup granulated sugar in base with erythritol-based monk fruit blend (like Lakanto Golden); reduce brown sugar to ½ cup; use sugar-free red gel coloring. Note: Texture may be slightly less fudgy; chilling becomes even more critical for set.
- Funfetti Fusion: Fold ⅓ cup rainbow nonpareils into the red velvet base *after* swirling—adds celebratory sparkle without affecting structure (they won’t bleed if added post-swirl).
Health Considerations and Nutritional Value
While undeniably indulgent, mindful preparation allows for informed enjoyment. Per standard 3×3-inch bar (recipe yields 16), approximate nutrition facts are: Calories: 425 | Total Fat: 26g (16g saturated) | Cholesterol: 115mg | Sodium: 290mg | Total Carbohydrates: 47g (32g sugars, 1g fiber) | Protein: 5g. Key considerations include:
- Sugar Awareness: Total sugar per serving (~32g) exceeds the AHA’s recommended daily limit for women (25g) and approaches it for men (36g). To moderate, consider reducing granulated sugar in base by ¼ cup and using dark cocoa (higher flavanol content) for deeper flavor without added sweetness.
- Fat Profile: Primarily from butter and cream cheese—rich in saturated fat. Opting for grass-fed dairy increases omega-3s and CLA (conjugated linoleic acid), offering potential anti-inflammatory benefits.
- Cocoa Benefits: Natural cocoa powder is packed with flavonoids linked to improved endothelial function and antioxidant support. Choose minimally processed, pesticide-tested brands for maximum phytonutrient retention.
- Food Coloring Notes: While FDA-approved red dyes (Red #40) are considered safe in regulated amounts, some individuals report sensitivity (e.g., hyperactivity in children, migraines). Natural alternatives include beetroot powder (adds earthy sweetness and pink-magenta hue) or hibiscus extract—though color intensity and pH sensitivity require recipe adjustments.
- Dietary Accommodations: As noted in Variations, GF, vegan, and lower-sugar options exist—however, substitutions often alter texture, shelf life, and macro ratios. Always verify allergen statements on all packaged ingredients (especially food coloring and baking powder).
- Mindful Enjoyment: These brownies are best savored intentionally—not as background snacking. Pairing with herbal tea or black coffee enhances appreciation, slows consumption, and aids digestion.
Ingredients
For the Red Velvet Brownie Base:
- 1¾ cups (220g) all-purpose flour
- ¾ cup (75g) unsweetened natural cocoa powder (NOT Dutch-process)
- 1 tsp fine sea salt
- 1 tsp baking powder
- 1 cup (227g / 2 sticks) unsalted butter, cubed
- 1¾ cups (350g) granulated sugar
- 1 cup (200g) packed light brown sugar
- 4 large eggs, room temperature
- 2 tsp pure vanilla extract
- 1 tbsp white vinegar
- ½ cup (120ml) cold full-fat buttermilk
- 2–3 tbsp red gel food coloring (e.g., AmeriColor Super Red)
For the Cheesecake Swirl:
- 16 oz (454g / 2 blocks) full-fat brick cream cheese, room temperature
- ¾ cup (150g) granulated sugar
- ½ cup (120g) full-fat sour cream
- 1 large egg, room temperature
- 1 tsp pure vanilla extract
- ¼ tsp fine sea salt
For the Red Velvet Crumb Topping (optional but recommended):
- Reserved 1¼ cups red velvet batter (from step 3 above)
Directions
- Preheat oven to 325°F (163°C). Line a 9×13-inch metal baking pan with parchment paper, leaving 2-inch overhang on two opposite sides. Lightly grease parchment and pan edges.
- In a medium bowl, whisk together flour, cocoa powder, salt, and baking powder.
- In a large heatproof bowl, melt butter in microwave or double boiler. Let cool 2 minutes. Whisk in granulated and brown sugars until glossy (~1 minute). Add eggs one at a time, whisking vigorously after each until fully incorporated and slightly thickened. Whisk in vanilla.
- Sift dry ingredients over wet mixture in two additions, folding gently with silicone spatula until just combined. Stir in vinegar and buttermilk until uniform. Stir in red gel coloring until deeply, evenly red.
- Pour ~3¼ cups (⅔) batter into prepared pan; spread evenly. Reserve remaining ~1¼ cups batter in small bowl.
- Make cheesecake swirl: Beat cream cheese until smooth. Add sugar; beat until fluffy. Beat in sour cream, egg, vanilla, and salt until just combined. Transfer to piping bag.
- Pipe or spoon cheesecake batter over red velvet base. Swirl gently with knife. Drop small scoops of reserved batter on top; press lightly.
- Bake 48–55 minutes until edges are set, center jiggles slightly, and toothpick 1″ from edge shows moist crumbs.
- Cool completely in pan on wire rack (≥2 hours). Refrigerate uncovered ≥4 hours (preferably overnight).
- Lift out using parchment. Cut into 16 squares with hot, clean knife. Wipe knife between cuts.
FAQ
- Q: Can I use Dutch-process cocoa?
- A: No—Dutch-process cocoa is alkalized and neutralizes acidity, preventing the essential red color development from the vinegar/buttermilk reaction. Natural cocoa is required for authentic hue and tang.
- Q: Why did my cheesecake layer crack?
- A: Cracking usually results from rapid temperature change (opening oven too soon), overmixing the cheesecake batter, or cooling too quickly. Ensure gradual cooling—leave in turned-off oven with door ajar for 15 minutes post-bake before moving to rack.
- Q: Can I make these ahead?
- A: Absolutely! They improve in flavor and texture after 24–48 hours refrigeration. Bake up to 3 days ahead; store covered. Freeze for up to 3 months—thaw overnight in fridge.
- Q: My swirls disappeared—what went wrong?
- A: Likely over-swirled or used too much pressure. Use light, shallow passes. Also, ensure cheesecake batter isn’t too runny (overbeaten egg or cold ingredients cause thinness).
- Q: Can I omit the crumb topping?
- A: Yes—you’ll still have stunning brownies. But the topping adds textural contrast, visual flair, and intensified red velvet flavor. Highly encouraged!
- Q: Is there a way to reduce the red dye?
- A: Yes—reduce to 1 tbsp gel for a softer rose tone, or try 2 tsp beetroot powder + 1 tsp gel for earthier depth. Note: natural options yield less vibrant, more variable results.
- Q: What if I don’t have buttermilk?
- A: Make DIY buttermilk: ½ cup whole milk + 1½ tsp white vinegar or lemon juice. Let sit 5 minutes until slightly curdled.
- Q: Can I use a glass or ceramic pan?
- A: Not recommended. Metal conducts heat evenly and rapidly, critical for proper crust formation and consistent baking. Glass/ceramic retains heat longer, increasing risk of overbaked edges and underbaked centers—even at reduced temp.
- Q: How do I prevent sticking to the knife?
- A: Use a very sharp knife. Heat under hot water, dry *thoroughly*, cut, then repeat. Never skip drying—the moisture causes sticking more than heat does.
- Q: Are these suitable for freezing?
- A: Yes! Wrap individual bars tightly in plastic wrap, then place in airtight freezer bag or container. Freeze up to 3 months. Thaw overnight in fridge—do not thaw at room temperature to prevent condensation and sogginess.
Summary
Red Velvet Cheesecake Brownies are a masterclass in dessert alchemy—melding the nostalgic charm of red velvet, the luxurious tang of New York–style cheesecake, and the deep, fudgy comfort of premium brownies into one showstopping, sliceable marvel.
With meticulous attention to ingredient temperature, precise swirling technique, and mandatory chilling, these brownies deliver restaurant-worthy elegance, irresistible visual drama, and a perfectly balanced interplay of sweet, tangy, rich, and velvety textures—making them a timeless centerpiece for any celebration or cherished moment of quiet indulgence.