Introduction
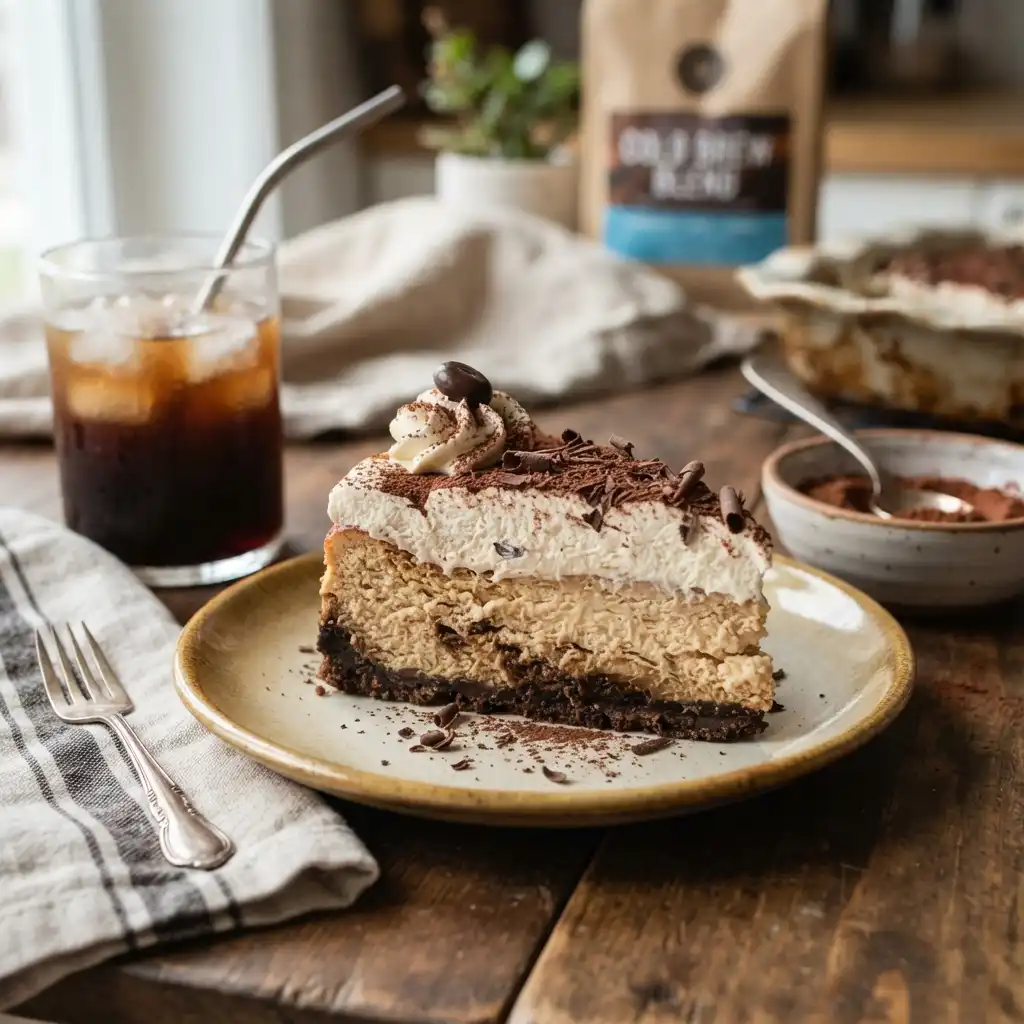
Welcome to the ultimate fusion of dessert innovation, where the velvety richness of New York-style cheesecake meets the sophisticated allure of Italian Tiramisu, all elevated by the smooth, robust notes of cold brew coffee. The Heavenly Tiramisu Cold Brew Cheesecake is not merely a dessert; it is an experience designed to tantalize every taste bud and create a memorable moment of indulgence. Imagine sinking a fork into a creamy, dense layer of sweetened mascarpone and cream cheese, infused with the deep, chocolatey undertones of espresso, all resting upon a crunchy cocoa-cookie crust. This recipe bridges the gap between classic baking traditions and modern coffee culture, resulting in a treat that is perfect for dinner parties, special celebrations, or a luxurious weekend treat.
In this comprehensive guide, we will explore every facet of creating this masterpiece. From understanding the historical roots of the components to mastering the chemistry of the perfect set, you will be equipped with the knowledge to bake with confidence. Whether you are a seasoned pastry chef or a home baker looking to impress, this decadent delight promises to become a staple in your culinary repertoire. Prepare to embark on a journey of flavor, texture, and aroma that defines modern indulgence.
The History
To truly appreciate the Heavenly Tiramisu Cold Brew Cheesecake, one must understand the lineage of its constituent parts. The story begins with Tiramisu, the iconic Italian dessert whose name translates to “pick me up” or “cheer me up.” Originating in the Veneto region of Italy in the 1960s, though debated by historians, Tiramisu revolutionized desserts by incorporating raw eggs, mascarpone cheese, and coffee-soaked ladyfingers. It was a departure from baked custards, offering a chilled, creamy texture that became synonymous with Italian dolce vita.
Parallel to this is the history of Cheesecake, which dates back to ancient Greece, where it was served to athletes during the first Olympic games as a source of energy. Over centuries, it evolved through Europe, eventually finding its modern home in New York City, where the addition of heavy cream and extra egg yolks created the dense, rich style we know today. The fusion of these two giants represents a meeting of Mediterranean flair and American abundance.
Finally, the inclusion of Cold Brew Coffee adds a contemporary twist. Unlike hot espresso, which can sometimes curdle dairy or taste acidic, cold brew is steeped for 12 to 24 hours, resulting in a concentrate that is smooth, low in acidity, and intensely flavorful. This modern brewing method, popularized in the United States and Japan during the late 20th century, provides the perfect backbone for this cheesecake, ensuring the coffee flavor remains prominent without overpowering the delicate dairy notes. Together, these histories converge to create a dessert that honors the past while embracing the future of flavor.
Ingredients Breakdown
Understanding the role of each component is crucial for baking success. Here is a detailed analysis of why we choose specific ingredients for this recipe:
Cream Cheese and Mascarpone
The backbone of the filling is a dual-cheese approach. Full-fat cream cheese provides the structural integrity and the classic tang associated with cheesecake. Mascarpone cheese, an Italian double-crème cheese, introduces a higher fat content and a buttery sweetness that mimics the traditional Tiramisu filling. Using both ensures the cake is firm enough to slice yet creamy enough to melt on the tongue.
Cold Brew Concentrate
We utilize cold brew concentrate rather than standard brewed coffee or instant espresso powder. The concentrate offers a robust coffee flavor without the water content that could weaken the setting agents in the cheesecake. Its low acidity prevents the dairy from seizing or curdling during the mixing process, ensuring a silky smooth texture.
Ladyfingers and Cocoa Powder
Traditional Tiramisu uses Savoiardi biscuits, and we maintain this tradition for the crust and garnish. Cocoa powder is dusted on top to provide a bitter contrast to the sweet filling. It is essential to use unsweetened, high-quality cocoa powder to balance the sugar content in the cheese mixture. The ladyfingers in the crust are crushed to provide a sponge-like base that absorbs moisture without becoming mushy.
Sugar and Eggs
Granulated sugar is used to sweeten the mixture, but care is taken not to over-sweeten, allowing the coffee to shine. Large eggs act as the binding agent. They coagulate during baking (or setting, in no-bake variations) to give the cheesecake its shape. Room temperature eggs are vital to prevent lumps and ensure even emulsification.
Step-by-Step Recipe
Creating this cheesecake is a process of patience and precision. Follow this narrative guide to understand the flow of the recipe before diving into the specific measurements.
Phase 1: Preparation and Crust
Begin by preheating your oven if you are opting for a baked crust, or preparing your springform pan for a chilled set. The crust requires crushing the ladyfingers finely and mixing them with melted butter and a touch of cocoa powder. Press this mixture firmly into the bottom of the pan using the bottom of a measuring cup to ensure an even layer that won’t crumble when sliced. This base must be chilled firmly before the filling is added to prevent sogginess.
Phase 2: The Coffee Infusion
While the crust sets, prepare your coffee mixture. If you do not have ready-made cold brew, steep coarse ground coffee in cold water for 18 hours. Strain it thoroughly. You will mix a portion of this concentrate with a little sugar to create a syrup that will be brushed onto the ladyfinger layers or infused directly into the cheese filling, depending on the specific texture you desire. For this recipe, we infuse it directly into the cheese for a uniform flavor profile.
Phase 3: The Filling Emulsion
This is the most critical step. Beat the cream cheese until completely smooth before adding any sugar. Add the sugar gradually to avoid graininess. Incorporate the mascarpone gently to maintain its airy texture. Add the eggs one at a time, mixing on low speed just until combined. Overmixing at this stage incorporates too much air, which can cause the cheesecake to crack during cooling. Fold in the cold brew concentrate last.
Phase 4: Baking and Cooling
Pour the filling over the chilled crust. If baking, use a water bath to ensure gentle, even heat distribution. If making a no-bake version, ensure your gelatin or setting agent is properly bloomed. Once cooked or set, the cooling process must be gradual. Move the cheesecake from the oven to the counter, then to the fridge. This thermal shock prevention is key to a smooth surface.
Phase 5: The Finish
Before serving, dust the top generously with cocoa powder using a fine-mesh sieve. For an extra touch of elegance, you can pipe rosettes of whipped cream around the edge. Let the cake sit out for 15 minutes before slicing to allow the flavors to awaken.
Tips
- Room Temperature is Key: Ensure all dairy products and eggs are at room temperature before mixing. Cold ingredients lead to lumps that are impossible to smooth out without overmixing.
- Don’t Overmix: Once the eggs are added, mix only until just combined. Excess air bubbles expand in the oven and collapse as the cake cools, causing cracks.
- Use a Water Bath: If baking, wrap the springform pan in foil and place it in a larger pan filled with hot water. The steam creates a humid environment that prevents the top from drying out and cracking.
- Chill Thoroughly: Cheesecake firms up as it chills. For the best slices, refrigerate for at least 12 hours, preferably 24 hours, before cutting.
- Hot Knife Technique: To get clean slices, dip your knife in hot water and wipe it dry between each cut. This melts through the creamy filling smoothly.
- Coffee Strength: Taste your cold brew concentrate before adding it. If it is too weak, reduce it on the stove slightly to intensify the flavor without adding water volume.
Variations and Customizations
This recipe is a canvas for your creativity. Here are several ways to customize the Heavenly Tiramisu Cold Brew Cheesecake:
Alcohol-Infused
Traditional Tiramisu often includes Marsala wine or Kahlúa. You can add a tablespoon of coffee liqueur to the filling or brush the crust with a mixture of espresso and rum for an adult-oriented version.
Gluten-Free
Replace the ladyfingers in the crust with gluten-free almond flour cookies or crushed gluten-free graham crackers. Ensure your cocoa powder is certified gluten-free to avoid cross-contamination.
Vegan Adaptation
Use cashew-based cream cheese and coconut cream instead of dairy. Agar-agar can be used as a setting agent instead of eggs. Note that the flavor profile will be slightly coconut-forward.
Chocolate Lover’s Twist
Add melted dark chocolate to the cheese filling for a Mocha Cheesecake variation. You can also mix chocolate chips into the crust for added texture and richness.
Keto Friendly
Substitute granulated sugar with erythritol or monk fruit sweetener. Use almond flour for the crust base instead of ladyfingers to keep the carbohydrate count low.
Health Considerations and Nutritional Value
While this dessert is undeniably indulgent, understanding its nutritional profile helps in enjoying it mindfully. A standard slice of this cheesecake is rich in calories due to the high fat content in the cream cheese and mascarpone. However, it also provides a good source of protein and calcium from the dairy components. The coffee offers antioxidants, specifically chlorogenic acid, which may have anti-inflammatory properties. The cocoa powder adds flavonoids, which are beneficial for heart health.
Approximate nutritional value per slice (1/12th of cake):
- Calories: 450-550 kcal
- Total Fat: 35g (Saturated Fat: 20g)
- Carbohydrates: 30g (Sugars: 20g)
- Protein: 8g
- Caffeine: Approx. 30-50mg (depending on concentrate strength)
Enjoyment should be moderated. Consider sharing a slice or pairing it with fresh berries to add fiber and vitamins to the plate. For those with lactose intolerance, lactose-free cream cheese options are available and work well in this recipe.
Ingredients
- For the Crust:
- 2 cups ladyfinger cookies, crushed finely
- 1/2 cup unsalted butter, melted
- 2 tablespoons unsweetened cocoa powder
- 1 tablespoon granulated sugar
- For the Filling:
- 32 ounces (4 packages) full-fat cream cheese, softened
- 16 ounces mascarpone cheese, room temperature
- 1 1/2 cups granulated sugar
- 1/2 cup cold brew coffee concentrate
- 4 large eggs, room temperature
- 1 teaspoon vanilla extract
- 1/4 teaspoon salt
- For the Topping:
- 1/4 cup unsweetened cocoa powder, for dusting
- 1 cup heavy whipping cream (optional, for garnish)
- Chocolate shavings (optional)
Directions
- Prep the Pan: Preheat your oven to 325°F (160°C). Wrap the outside of a 9-inch springform pan with aluminum foil to prevent water leakage if using a water bath. Grease the inside lightly.
- Make the Crust: In a medium bowl, combine the crushed ladyfingers, melted butter, cocoa powder, and sugar. Mix until the texture resembles wet sand. Press firmly into the bottom of the prepared pan. Bake for 10 minutes, then remove and let cool completely.
- Mix the Cheese: In a large stand mixer fitted with a paddle attachment, beat the cream cheese on medium speed until smooth and creamy, about 2 minutes. Scrape down the sides of the bowl.
- Add Mascarpone and Sugar: Add the mascarpone and granulated sugar to the cream cheese. Beat on low speed until fully incorporated and smooth. Do not whip air into the mixture.
- Incorporate Liquids: Mix in the vanilla extract, salt, and cold brew concentrate until just combined. Scrape the bowl again to ensure uniformity.
- Add Eggs: Add the eggs one at a time, mixing on low speed after each addition just until the yolk disappears. Stop mixing immediately once the last egg is blended.
- Bake: Pour the filling over the cooled crust. Place the springform pan into a larger roasting pan and fill the roasting pan with 1 inch of hot water. Bake for 60-75 minutes. The center should still wobble slightly like Jell-O.
- Cool Gradually: Turn off the oven and crack the door open slightly. Let the cheesecake cool in the oven for 1 hour. Remove from the water bath and cool on a wire rack to room temperature.
- Chill: Cover the pan with plastic wrap and refrigerate for at least 12 hours, preferably 24 hours.
- Serve: Before serving, remove the ring of the springform pan. Dust the top generously with cocoa powder using a sieve. Slice with a hot knife and serve chilled.
FAQ
Can I make this cheesecake without baking?
Yes, you can make a no-bake version. Omit the eggs and add 2 tablespoons of gelatin bloomed in cold water and dissolved in a little warm coffee. Chill for at least 6 hours to set.
Why did my cheesecake crack?
Cracking is usually caused by overmixing (too much air), cooling too quickly, or overbaking. Using a water bath and cooling gradually in the oven helps prevent this.
How long does it last in the fridge?
Stored in an airtight container, this cheesecake will stay fresh for up to 5 days. The flavor often improves on the second day as the coffee infuses further.
Can I freeze this cheesecake?
Yes, you can freeze the cheesecake without the cocoa topping. Wrap it tightly in plastic wrap and foil. It will keep for up to 2 months. Thaw overnight in the refrigerator before dusting with cocoa.
What if I don’t have cold brew concentrate?
You can substitute with strong brewed espresso that has been cooled completely. However, ensure it is not watery, as excess liquid can affect the texture.
Summary
This Heavenly Tiramisu Cold Brew Cheesecake merges Italian classic flavors with modern coffee trends for a rich, creamy dessert.
Follow the detailed steps for a crack-free finish, chill thoroughly, and enjoy the perfect balance of coffee bitterness and sweet cheese.