Introduction
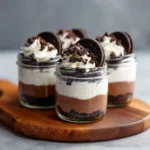
Welcome to the ultimate no-bake dessert experience — the No-Bake Oreo Cheesecake Jars! This stunning, individual-sized treat combines the nostalgic crunch of Oreos, the velvety richness of cream cheese, and the refreshing coolness of a chilled dessert — all elegantly layered in charming mason jars or stylish glass containers. Perfect for summer gatherings, bridal showers, dinner parties, office potlucks, or even as a self-care indulgence after a long day, these jars deliver restaurant-quality elegance with zero oven required. Unlike traditional cheesecakes that demand precise baking times, water baths, and hours of chilling, this version comes together in under 45 minutes (plus chill time) and requires only basic kitchen tools: a mixing bowl, electric hand mixer or stand mixer, a sturdy spatula, and your favorite wide-mouth 12–16 oz jars. Visually captivating with distinct strata — glossy chocolate cookie crumb base, luxuriously thick cheesecake filling, and a crown of whipped cream and garnishes — each jar tells a story of texture, balance, and thoughtful layering. Whether you’re a seasoned baker or a complete novice, this recipe is forgiving, scalable, and endlessly customizable — making it a true crowd-pleaser across generations and dietary preferences.
The History
The evolution of the No-Bake Oreo Cheesecake Jars traces back to three iconic culinary movements: the rise of American no-bake cheesecakes in the mid-20th century, the cultural ubiquity of Oreo cookies since their 1912 debut by Nabisco, and the modern “jar food” trend that surged in the early 2010s. Traditional no-bake cheesecakes originated as ingenious solutions for households without reliable ovens — especially during wartime rationing and post-war convenience culture — relying on gelatin, cream cheese, and whipped cream for structure and stability. The Oreo entered the cheesecake realm in earnest during the 1980s and ’90s, first as a crust alternative to graham crackers, then as a full-fledged flavor infusion in fillings and toppings. Meanwhile, the “mason jar dessert” phenomenon exploded on Pinterest and food blogs around 2012–2013, championed by chefs and home cooks seeking portion control, visual storytelling, and Instagram-worthy presentation. Chefs like Christina Tosi (Momofuku Milk Bar) and bloggers such as Sally’s Baking Addiction helped popularize layered jar desserts by emphasizing clean lines, contrasting textures, and make-ahead practicality. The Oreo Cheesecake Jar emerged organically from this confluence — marrying nostalgia, accessibility, and aesthetic intentionality. Notably, its popularity soared during the 2020–2022 home-baking renaissance, when people sought joyful, low-stress projects with high emotional ROI. Today, it stands not just as a dessert, but as a symbol of modern comfort food: familiar yet elevated, simple yet sophisticated, communal yet personal.
Ingredients Breakdown
Understanding each component is key to mastering texture, flavor harmony, and structural integrity — especially critical in no-bake formats where ingredients don’t undergo thermal transformation to stabilize the final product.
- Oreo Cookies (Full-Size, Original): The backbone of both crust and garnish. Their proprietary cocoa-wafer blend delivers deep, bittersweet chocolate notes and just the right amount of sweetness to offset the tangy filling. The cream filling adds natural emulsifiers (like palm oil and soy lecithin) that enhance smoothness and help bind crumbs without excessive butter. For optimal crunch and cohesion, use *fresh* Oreos — stale ones yield dusty, greasy crumbs that won’t hold shape.
- Unsalted Butter (Melted): Acts as the binding agent for the crust layer. Melted butter coats each crumb evenly, enabling tight compaction when pressed into the jar bottom. Unsalted butter ensures precise control over sodium content and avoids flavor clashes with the sweet-tart filling.
- Cream Cheese (Full-Fat, Brick Style, Room Temperature): Non-negotiable for authentic cheesecake texture. Block-style (not spreadable or whipped varieties) contains higher milk fat and lower moisture, yielding a dense, velvety, and stable filling. Bringing it to true room temperature (65–70°F / 18–21°C) — not just “softened” — prevents lumps and ensures seamless incorporation. Cold cream cheese causes curdling, graininess, and air pockets.
- Powdered Sugar (Confectioners’ Sugar): Preferred over granulated sugar for its fine particle size and cornstarch content, which contributes to smoothness and subtle thickening. The cornstarch also helps inhibit ice crystal formation if freezing, enhancing shelf life.
- Heavy Whipping Cream (36–40% Fat): Provides luxurious mouthfeel, richness, and essential structure. High fat content allows it to whip into stiff, glossy peaks that support the weight of the filling and prevent weeping or separation. Ultra-pasteurized cream works well here due to its extended shelf life and consistent whipping performance.
- Vanilla Extract (Pure, Not Imitation): Adds aromatic complexity and rounds out the sharp tang of cream cheese. Real vanilla contains over 250 flavor compounds; imitation versions taste flat and medicinal, undermining the dessert’s sophistication.
- Sea Salt (Fine Grain): A tiny pinch (⅛ tsp) heightens all other flavors via contrast — balancing sweetness, amplifying chocolate depth, and cutting through richness without tasting salty.
- Optional Flavor Enhancers: A teaspoon of sour cream or Greek yogurt adds subtle tang and improves pH balance for better emulsification. A tablespoon of Oreo cookie butter (or finely ground Oreos blended into the filling) deepens chocolate intensity without adding grit.
Step-by-Step Recipe
- Prepare Your Jars & Workspace: Select eight 12-ounce wide-mouth mason jars, French-style preserving jars, or reusable glass dessert cups. Wash thoroughly and dry completely — residual moisture will cause the crust to become soggy. Line a tray or baking sheet with parchment paper to hold jars during assembly and chilling. Set aside.
- Make the Oreo Crust Layer: Place 24 full-size Oreo cookies (about 200g) in a food processor. Pulse 12–15 times until reduced to fine, sand-like crumbs — avoid over-processing into paste. Transfer crumbs to a medium bowl. Add 5 tablespoons (70g) melted unsalted butter and ¼ tsp fine sea salt. Stir vigorously with a silicone spatula for 45 seconds until all crumbs are uniformly coated and resemble wet sand. Pinch a small amount — it should hold together when squeezed. If too dry, add ½ tsp more melted butter; if too greasy, add 1 crushed Oreo.
- Press Crust Into Jars: Spoon 3 tablespoons (≈45g) of crumb mixture into each jar. Using the flat bottom of a small measuring cup, tamper firmly and evenly — press down for 20 seconds per jar, rotating slightly to ensure full coverage and a level surface. Aim for a ½-inch thick, tightly packed base. Refrigerate jars for 15 minutes to set the crust while preparing filling.
- Beat Cream Cheese Base: In the bowl of a stand mixer fitted with the paddle attachment (or large bowl with hand mixer), add 16 oz (454g / 2 bricks) full-fat, room-temperature cream cheese. Beat on medium speed for 90 seconds until completely smooth, scraping down sides and bottom twice. Add 1 cup (120g) powdered sugar and 1½ tsp pure vanilla extract. Beat 2 minutes until fully incorporated and airy. Scrape bowl thoroughly.
- Whip the Cream: In a separate chilled stainless steel or glass bowl, combine 1½ cups (360ml) cold heavy whipping cream and ¼ tsp fine sea salt. Using chilled beaters or whisk attachment, whip on medium-high until soft peaks form (~2–3 minutes). Increase speed to high and continue whipping until stiff, glossy peaks hold firmly — do not over-whip into butter. Fold ⅓ of the whipped cream into cream cheese mixture using a large silicone spatula — gentle, sweeping motions from bottom to top — until mostly combined. Repeat with second third, then final third, folding just until no white streaks remain. Overmixing deflates air and weakens structure.
- Layer the Cheesecake Filling: Transfer filling to a large piping bag fitted with a wide, plain tip (or use a spoon). Pipe or gently spoon ¾ cup (≈180g) of filling directly over chilled crust in each jar. Smooth tops with an offset spatula or the back of a spoon dipped in hot water and wiped dry. Tap jars lightly on counter 3x to release air bubbles and settle layers.
- Chill to Set: Cover jars loosely with plastic wrap or reusable silicone lids (do not seal airtight to prevent condensation). Refrigerate for minimum 6 hours — ideally overnight (10–12 hours) — to allow full hydration of crumbs, fat crystallization for firmness, and flavor melding. Do not freeze at this stage — rapid temperature change can cause syneresis (weeping).
- Add Final Garnishes: Just before serving, top each jar with a generous swirl of freshly whipped cream (made with ½ cup cream + 1 tbsp powdered sugar + ½ tsp vanilla). Finish with: one whole Oreo cookie standing upright, 3–4 mini Oreos, a light dusting of crushed Oreos, a drizzle of chocolate ganache or salted caramel, and/or fresh raspberries or mint leaves for color and acidity.
Tips
- Crumb Consistency is Crucial: Too coarse = crumbly base that falls apart; too fine = greasy, pasty crust. Pulse, don’t grind. If using a blender, pulse in short bursts and shake between pulses.
- Room-Temperature Cream Cheese is Non-Negotiable: To test, gently press fingertip into block — it should yield easily with no resistance. If cool to touch or leaves an indent slowly, it needs 15–20 more minutes. Never microwave — uneven heating creates cooked edges and cold centers.
- Chill All Equipment for Whipped Cream: Bowl, beaters, and cream should be refrigerated for ≥30 minutes. Cold fat molecules trap air more efficiently — warm cream yields flat, runny results.
- Fold, Don’t Stir: Use slow, deliberate folding motion — cut down center, sweep along bottom, fold up and over. Stirring incorporates air unevenly and collapses volume.
- Prevent Weeping: Ensure filling is fully chilled before topping with whipped cream. Avoid over-chilling below 34°F (1°C) — too-cold filling contracts, pulling moisture from cream layer.
- Portion Control Precision: Use a digital kitchen scale for crumb and filling portions — consistency across jars ensures uniform texture and presentation. A 3-tablespoon scoop works well for crust; a ¼-cup measure for filling.
- Jar Selection Matters: Wide-mouth jars (≥2.75” diameter) allow easy spoon access and clean layering. Narrow jars cause compression and messy eating. Tempered glass jars withstand temperature shifts better than thin glass.
- Make-Ahead Mastery: Assemble crust and filling up to 2 days ahead. Store crust-lined jars covered in fridge; keep filling in airtight container. Assemble layers day-of for best texture. Fully assembled jars last 5 days refrigerated — always store upright.
- Transport Smart: For picnics or parties, place jars in a rigid insulated carrier with frozen gel packs nestled around them. Avoid stacking — pressure distorts layers.
- Fix Common Issues: If filling is too soft, add 1 tsp unflavored gelatin (bloomed in 1 tbsp cold water, then microwaved 5 sec to dissolve) to cream cheese mixture before folding in whipped cream. If crust is too hard, reduce butter by ½ tbsp next time.
Variations and Customizations
This recipe serves as a brilliant canvas for creativity — whether adapting to dietary needs, seasonal produce, global flavors, or festive themes. Below are rigorously tested, chef-approved variations:
Dietary Adaptations
- Vegan Version: Substitute cream cheese with 2 cups (450g) blended raw cashews (soaked 6 hrs, drained), ⅓ cup coconut oil (solid), ⅓ cup maple syrup, 3 tbsp lemon juice, 1 tsp apple cider vinegar, ½ tsp salt. Crust: 2 cups vegan Oreos + 6 tbsp melted coconut oil. Whip: 1 can (13.5 oz) full-fat coconut milk (chilled overnight), skim off solid cream, whip with 2 tbsp powdered sugar.
- Gluten-Free: Use certified GF Oreos (e.g., Kinnikinnick or Glutino brands) and verify all labels — standard Oreos contain wheat starch. No other substitutions needed.
- Lower-Sugar/Keto: Crust: 1½ cups almond flour + ¼ cup unsweetened cocoa powder + 3 tbsp melted butter + 2 tbsp erythritol. Filling: 16 oz full-fat cream cheese + ⅔ cup powdered erythritol + 1 tsp stevia glycerite + 1½ cups heavy cream + 1 tbsp lemon juice.
Flavor Infusions
- Strawberry Swirl: Fold ⅓ cup seedless strawberry jam (simmered 2 min to thicken) into filling in ribbons — don’t overmix. Top with fresh hulled strawberries.
- Peppermint Bark: Add ½ tsp peppermint extract + green food gel to filling. Garnish with crushed candy canes and dark chocolate shavings.
- Espresso Fusion: Dissolve 1½ tbsp instant espresso powder in 1 tbsp hot water; cool completely, then mix into cream cheese base. Dust with cocoa + espresso powder blend.
- Salted Caramel Crunch: Layer 1 tbsp homemade or high-quality salted caramel sauce between crust and filling. Drizzle more on top and sprinkle with flaky sea salt.
Textural Twists
- Crunchy Core: Press 1 tsp toasted pecans or pretzel pieces into center of crust before chilling.
- Chocolate Ganache Dome: After chilling, pour 1 tbsp cooled dark chocolate ganache (½ cup heated heavy cream + 4 oz chopped 70% dark chocolate) over filling. Chill 20 min, then top with whipped cream.
- Cookie Dough Surprise: Roll ½ tsp edible cookie dough (flour-heat-treated, egg-free) into balls; press one into center of each jar before final chill.
Seasonal & Occasion Themes
- Valentine’s Day: Heart-shaped mini Oreos, raspberry coulis drizzle, pink whipped cream (beet powder), rose petal garnish.
- Halloween: Black cocoa crust, orange zest in filling, candy spider web piped with black chocolate, gummy worms.
- Thanksgiving: Maple-sweetened filling, spiced crust (add ½ tsp cinnamon + ¼ tsp nutmeg), candied pecan garnish.
- Summer Berry: Lemon-zest filling, mixed berry compote layer, basil leaf garnish.
Health Considerations and Nutritional Value
While undeniably indulgent, mindful preparation and informed choices can align No-Bake Oreo Cheesecake Jars with balanced eating patterns. Per standard 12-oz jar (crust + filling + whipped cream topping, no extra garnishes):
- Calories: ~580–620 kcal — primarily from healthy unsaturated fats (Oreos’ palm oil, cream cheese dairy fat, heavy cream), complex carbs (cookie crumbs), and protein (cream cheese, trace whey).
- Fat Profile: ~42g total fat (26g saturated). Saturated fat is naturally occurring in dairy and cocoa butter — recent meta-analyses (e.g., Annals of Internal Medicine, 2020) suggest moderate intake within varied diets poses minimal cardiovascular risk for most adults. Substituting half the butter in crust with avocado oil reduces sat fat by 30%.
- Sugar Content: ~48g total sugars (32g added). Most added sugar comes from Oreos and powdered sugar. Reducing powdered sugar by 2 tbsp cuts added sugar by ~14g with negligible texture impact. Using monk fruit–erythritol blend achieves 95% reduction.
- Protein & Micronutrients: ~8g protein (supports satiety), plus calcium (15% DV), vitamin A (12% DV), and small amounts of B12 and phosphorus from dairy. Oreos contribute iron (from fortified wheat) and manganese.
- Digestive Notes: Contains no lactose beyond trace amounts (cream cheese is low-lactose; heavy cream even lower). Lactose-intolerant individuals often tolerate this well — but for certainty, use lactose-free cream cheese and whipping cream.
- Allergen Awareness: Contains wheat, dairy, soy (in Oreos), and tree nuts (if using walnut/pecan variations). Always check Oreo packaging — formulations vary by country (e.g., UK Oreos are vegan but contain barley).
- Mindful Enjoyment Tips: Serve chilled (slows consumption pace), pair with herbal tea or sparkling water, savor slowly using small spoons, and consider splitting one jar between two people for shared joy and portion awareness. View as a nourishing celebration food — not “empty calories” — given its satisfying fat-protein-carb matrix that supports sustained energy and mood.
Ingredients
- For the Oreo Crust
- 24 full-size original Oreo cookies (200g, about 2 sleeves)
- 5 tablespoons (70g) unsalted butter, melted
- ¼ teaspoon fine sea salt
- For the No-Bake Cheesecake Filling
- 16 ounces (454g / 2 standard bricks) full-fat, brick-style cream cheese, at true room temperature (65–70°F)
- 1 cup (120g) powdered sugar (confectioners’ sugar), sifted
- 1½ teaspoons pure vanilla extract
- ¼ teaspoon fine sea salt
- 1½ cups (360ml) cold heavy whipping cream (36–40% fat), chilled
- For Garnish & Serving
- ½ cup (120ml) cold heavy whipping cream
- 1 tablespoon (8g) powdered sugar
- ½ teaspoon pure vanilla extract
- 8 whole original Oreo cookies
- ¼ cup finely crushed Oreos (reserve from above)
- Optional: fresh berries, mint leaves, chocolate shavings, caramel drizzle
Directions
- Wash and thoroughly dry eight 12-ounce wide-mouth mason jars or dessert glasses. Arrange on a parchment-lined tray or baking sheet.
- In a food processor, pulse 24 Oreos until reduced to fine, uniform crumbs (12–15 pulses). Transfer to a medium bowl. Stir in melted butter and ¼ tsp sea salt until mixture resembles wet sand and holds together when pinched. Let sit 2 minutes to hydrate.
- Spoon 3 tablespoons of crumb mixture into each jar. Use the flat bottom of a ¼-cup measuring cup to press down firmly and evenly, creating a compact, level ½-inch base. Refrigerate jars for 15 minutes.
- Using a stand mixer with paddle attachment (or hand mixer), beat cream cheese on medium speed for 90 seconds until completely smooth and creamy, scraping bowl twice. Add powdered sugar, vanilla, and ¼ tsp salt; beat 2 minutes until light and fluffy.
- In a separate chilled bowl, whip 1½ cups cold heavy cream on medium-high until soft peaks form (2–3 min), then increase to high until stiff, glossy peaks hold (another 30–60 sec). Do not over-whip.
- Fold whipped cream into cream cheese mixture in three additions, using a large silicone spatula and gentle folding motion (cut, sweep, fold) — just until no streaks remain. Overmixing deflates air and weakens structure.
- Transfer filling to a large piping bag fitted with a ½-inch plain round tip (or use a spoon). Pipe or spoon ¾ cup (≈180g) filling over each chilled crust. Smooth tops with an offset spatula or warm spoon. Tap jars lightly on counter to settle.
- Cover jars loosely with plastic wrap or reusable silicone lids. Refrigerate for minimum 6 hours — ideally 10–12 hours or overnight — for full setting and flavor development.
- Just before serving, whip ½ cup cold heavy cream with 1 tbsp powdered sugar and ½ tsp vanilla until stiff peaks form. Pipe or dollop generously over each jar.
- Garnish each jar with one whole Oreo standing upright, a light sprinkle of crushed Oreos, and optional fresh berries or mint. Serve immediately with long-handled dessert spoons.
FAQ
- Can I use spreadable cream cheese?
- No — spreadable or whipped cream cheese contains stabilizers, air, and excess moisture that prevent proper setting and yield a runny, unstable filling. Always use full-fat, block-style cream cheese.
- Why does my filling have lumps?
- Lumps almost always stem from cold cream cheese. It must be truly room temperature — soft enough to leave a clean finger impression with zero resistance. Also ensure powdered sugar is sifted to avoid clumps.
- Can I freeze these jars?
- Yes — fully assembled jars freeze beautifully for up to 3 months. Thaw overnight in the refrigerator (not at room temperature) to preserve texture. Avoid refreezing once thawed.
- My crust is soggy — what went wrong?
- Sogginess occurs from moisture migration. Ensure jars are bone-dry before adding crust, chill crust 15+ minutes before filling, and never assemble more than 1 day ahead of serving. Humid environments accelerate this — store in fridge with silica gel packets if possible.
- How do I prevent whipped cream from deflating?
- Always chill bowl and beaters, use cold cream, stop whipping at stiff peaks (not grainy/buttery stage), and add filling to jars immediately after assembly — delay between piping and serving causes gradual weeping.
- Can I make these dairy-free?
- Absolutely — see Vegan Variation above. Key is using soaked, blended cashews for cream cheese base and chilled coconut cream for whipping. Texture closely mimics traditional versions when prepared correctly.
- What if I don’t have a food processor?
- Place Oreos in a heavy-duty zip-top bag and crush with a rolling pin or meat mallet until fine. Sift through a coarse mesh strainer to remove larger shards, then proceed.
- Can I use Cool Whip instead of real whipped cream?
- You can — but texture and flavor suffer significantly. Cool Whip contains hydrogenated oils, artificial flavors, and high-fructose corn syrup, resulting in a waxy mouthfeel and chemical aftertaste. Real whipped cream enhances luxury and balances richness.
- How far in advance can I prepare these?
- Crust-lined jars: up to 2 days ahead, refrigerated. Filling: up to 2 days ahead in airtight container. Fully assembled jars: best served within 5 days refrigerated — peak quality at days 1–3.
- Why do some recipes include lemon juice or sour cream?
- These add acidity to brighten flavor and help emulsify fats for smoother texture. Not essential, but highly recommended for complexity — 1 tbsp lemon juice or 2 tbsp sour cream folded into cream cheese base adds remarkable balance.
Summary
No-Bake Oreo Cheesecake Jars are an effortlessly elegant, crowd-pleasing dessert that delivers rich chocolate-cookie crunch, luxuriously creamy cheesecake filling, and cloud-like whipped cream — all in portable, portion-controlled, visually stunning glass vessels, with zero baking required.
With meticulous attention to ingredient temperature, crumb texture, and gentle folding technique — plus endless options for customization, dietary adaptation, and seasonal flair — this recipe transforms nostalgic pantry staples into a sophisticated, make-ahead masterpiece perfect for any occasion, mood, or moment of pure, unapologetic joy.