Introduction
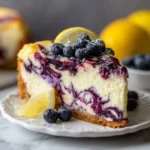
Mini Burnt Basque Cheesecakes are the irresistibly charming, rustic, and deeply flavorful cousins of the iconic Basque cheesecake—scaled down to bite-sized perfection. Originating from the San Sebastián region of Spain’s Basque Country, this dessert has captivated global bakers with its striking contrast: a dramatically caramelized, almost charred exterior that gives way to an impossibly creamy, velvety, molten-center interior. Unlike traditional cheesecakes that demand water baths, precise chilling, and delicate crusts, the Mini Burnt Basque Cheesecake embraces intentional imperfection—high heat, no crust, minimal ingredients, and zero pretense. Its miniature format makes it ideal for portion control, elegant plating, party favors, bridal showers, holiday dessert tables, or even gourmet food gifting. Whether you’re a seasoned pastry chef or a curious home baker, these petite powerhouses deliver maximum impact with surprising simplicity—and once you master the subtle art of “controlled burning,” you’ll never look at cheesecake the same way again.
The History
The story of the Burnt Basque Cheesecake begins in the late 1990s at La Viña, a beloved family-run restaurant tucked in the cobblestone alleys of San Sebastián’s Old Town. Chef Santiago Rivera, inspired by classic New York-style cheesecake but constrained by limited oven calibration and equipment, accidentally left a batch in the oven too long—resulting in a deeply bronzed, crackled top. To his surprise, diners adored the rich, toasty, almost crème brûlée–like crust paired with the lusciously dense yet airy center. Rather than correcting the “mistake,” Rivera refined it: he intentionally cranked up the oven temperature (often to 400–450°F / 200–230°C), skipped the water bath, omitted the crust, and leaned into high-fat, high-quality dairy. The result was a revolutionary cheesecake—rustic, unapologetically imperfect, and deeply evocative of Basque culinary philosophy: respect for ingredients, reverence for technique disguised as spontaneity, and celebration of texture contrasts. By the mid-2010s, social media catapulted La Viña’s creation to international stardom—especially after food bloggers and influencers shared mesmerizing videos of the dramatic “burn.” Soon, chefs across Tokyo, Paris, New York, and Melbourne began adapting it—scaling it down into individual portions. The mini version emerged not just as a novelty, but as a brilliant evolution: faster bake time, more consistent results per unit, easier serving, superior surface-to-interior ratio (amplifying that prized burnt-custard note), and enhanced visual appeal. Today, Mini Burnt Basque Cheesecakes appear on Michelin-starred menus, artisanal bakery counters, viral TikTok tutorials, and even high-end wedding dessert tables—proving that sometimes, the most profound culinary innovations begin with a beautifully orchestrated accident.
Ingredients Breakdown
What makes Mini Burnt Basque Cheesecakes so extraordinary is their deceptive simplicity—just six core ingredients, each playing a non-negotiable role in structure, flavor, and texture:
- Cream Cheese (Full-Fat, Block Style): The undisputed foundation—use high-quality, Philadelphia-style brick cream cheese at room temperature. Avoid low-fat, whipped, or spreadable varieties; they contain stabilizers and excess moisture that sabotage texture. Room-temp cheese blends smoothly, prevents lumps, and ensures proper emulsification. For mini versions, 16 oz (450g) yields ~24 standard mini cheesecakes (2.5″ muffin tin).
- Granulated Sugar: Not just for sweetness—sugar aids in tenderizing the protein network, contributes to browning via the Maillard reaction and caramelization, and helps retain moisture. Fine granulated sugar dissolves most reliably; avoid raw or coarse sugars unless fully dissolved in warm cream first.
- Heavy Cream (36–40% Fat): The secret to silkiness and controlled “burn.” High fat content slows coagulation, allowing the center to remain fluid longer while the surface crisps. It also carries flavor and adds luxurious mouthfeel. Ultra-pasteurized cream works best for stability, though pasteurized is acceptable if handled gently.
- Eggs (Large, Room Temperature): Act as both binder and leavening agent. Their proteins set the structure, while the yolks contribute richness and emulsification. Room-temp eggs incorporate more evenly and reduce risk of curdling. Overmixing post-egg addition introduces air, leading to cracks or uneven rise—so fold, don’t whisk.
- Sour Cream or Crème Fraîche: A critical acidity and moisture modulator. Adds tang that balances sweetness, improves tenderness, and lowers pH slightly to inhibit over-coagulation. Crème fraîche (10–15% fat, cultured) offers superior depth and less whey separation than standard sour cream—highly recommended for premium results.
- Vanilla Extract (Pure, Alcohol-Based): Enhances aromatic complexity without masking the dairy’s natural nuttiness. Avoid imitation vanilla—it can taste medicinal under high heat. For elevated nuance, consider splitting the vanilla bean and scraping seeds directly into the warm cream before mixing.
Optional—but highly encouraged—enhancers:
- Sea Salt (Flaky or Fine): A pinch (¼ tsp) heightens all other flavors and counterbalances sweetness. Add with dry ingredients.
- Lemon Zest (Microplaned): Just ½ tsp brightens richness without adding liquid. Avoid juice—it alters pH and consistency.
- High-Quality Sea Salt Flakes (Maldon or Fleur de Sel): Sprinkled immediately post-bake for textural contrast and savory-sweet finish.
Step-by-Step Recipe
Makes 24 mini cheesecakes (using standard 2.5-inch muffin tin)
- Prep & Preheat: Line a standard 24-cup muffin tin with parchment paper liners—cut circles for the bottoms and tall, snug sleeves (2.75″ high) for the sides. This ensures clean release and defined edges. Position oven rack in the lower third. Preheat oven to 425°F (220°C)—do not skip preheating; thermal shock is essential for surface development. Allow at least 25 minutes for full stabilization.
- Softening & Blending Base: In a large bowl, beat room-temperature cream cheese with an electric mixer on medium-low for 1 minute until completely smooth and glossy—no lumps, no graininess. Scrape bowl thoroughly. Gradually add sugar (and salt, if using) and beat 2 minutes more until lightened in color and texture—this incorporates micro-air and begins sugar dissolution.
- Incorporating Dairy: Reduce speed to low. Add sour cream (or crème fraîche) and mix just until combined (~15 seconds). Then slowly stream in heavy cream while mixing continuously. Stop as soon as uniform—overmixing here causes excess air bubbles and potential weeping. Scrape bowl and beater.
- Egg Integration (Critical Step): Add eggs one at a time, beating on low for exactly 15 seconds after each addition—no more, no less. After the final egg, mix only until yolk disappears into batter (~10 seconds). Batter should be thick, pourable, and satiny—not foamy or separated. If tiny specks remain, strain through a fine-mesh sieve for ultra-smooth texture.
- Flavor Infusion: Gently fold in vanilla extract (and lemon zest, if using) with a silicone spatula using 3–4 slow turns—just enough to distribute.
- Filling & Smoothing: Pour batter into prepared liners, filling each to ¾ full (~3 tbsp per cup). Tap tin sharply 3x on counter to release air bubbles. Use an offset spatula or butter knife to level tops—smooth, flat surfaces maximize even browning.
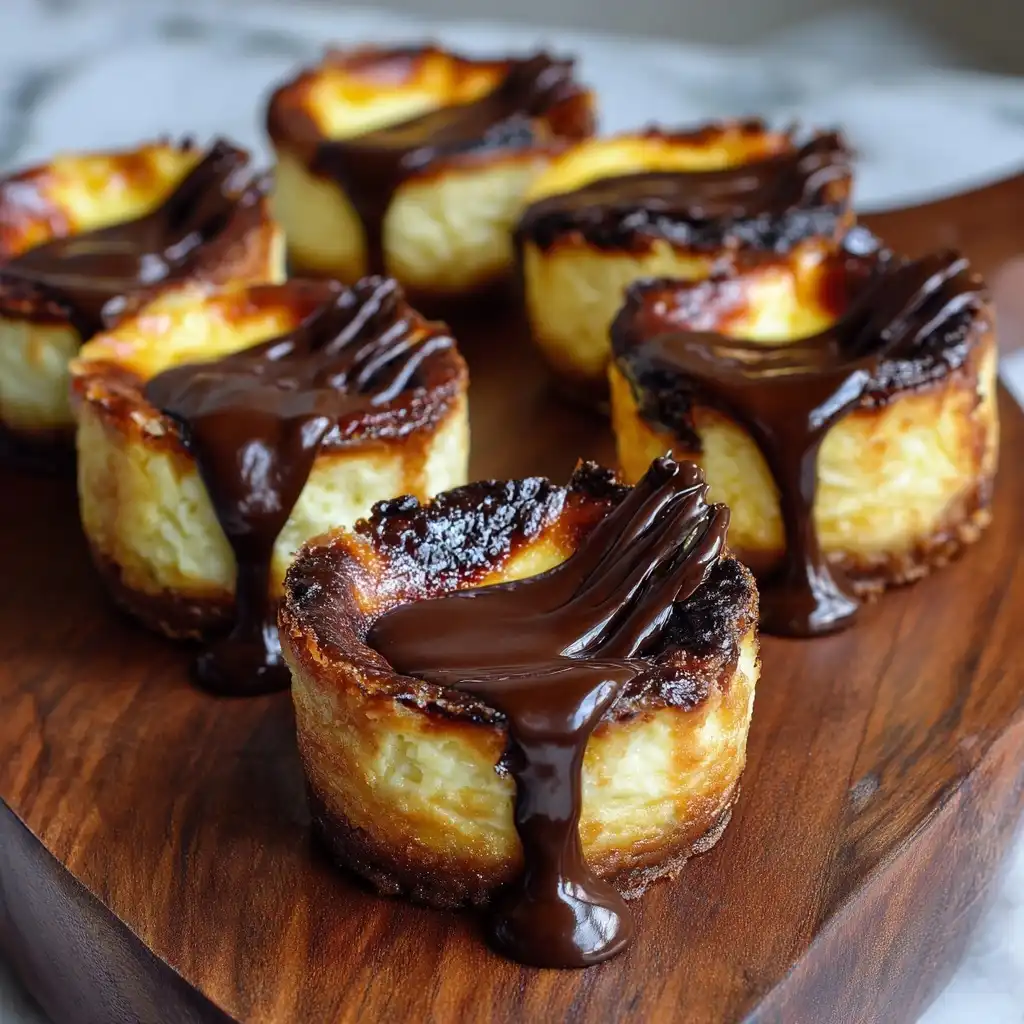
- Baking with Precision: Place tin on lowest oven rack. Bake at 425°F (220°C) for exactly 14–16 minutes. At 12 minutes, peek: edges should be puffed and beginning to darken. At 14 minutes, tops should be deeply amber to mahogany—deeply cracked, blistered, and fragrant with toasted dairy notes. Center should still jiggle *slightly* like set Jell-O when gently shaken—not liquid, not firm. Do not open oven door before 12 minutes.
- Cooling Protocol: Remove tin immediately. Let cool on wire rack for 15 minutes—this allows residual heat to gently finish cooking the centers without overbaking. Then, carefully lift each cheesecake by its parchment sleeve and transfer to rack to cool completely (1–2 hours). Do NOT refrigerate while warm—condensation causes sogginess.
- Chilling & Setting: Once fully cooled to room temp, cover loosely with parchment and refrigerate for minimum 8 hours, ideally 12–24 hours. This transforms texture: centers tighten into luxuriously dense, spoonable custard while maintaining melt-in-mouth tenderness. Overnight chill also deepens flavor harmony.
- Finishing Touches: Just before serving, gently peel away parchment sleeves. Optional: sprinkle flaky sea salt on each top. Serve chilled—but allow 10 minutes at room temperature for optimal creaminess and aroma release.
Tips
- Oven Calibration Is Non-Negotiable: Most home ovens run hot or cold. Use an independent oven thermometer placed on the rack where the tin will sit. Even a 25°F variance affects browning and set time drastically.
- Parchment Is Your Partner: Never substitute silicone cups or greased tins. Parchment provides insulation against over-browning on sides and enables seamless release without damaging the fragile, caramelized crust.
- Temperature Consistency Wins: All dairy and eggs must be truly room temperature (68–72°F)—take cream cheese out 4+ hours ahead; submerge eggs in warm water for 10 minutes if rushed. Cold ingredients cause curdling and uneven baking.
- The “Jiggle Test” Is Everything: When shaking the tin gently, the center 1-inch should have a soft, unified wobble—not sloshing, not still. If it ripples outward, it’s underbaked. If it’s motionless, it’s overbaked.
- No Peeking, No Panic: Opening the oven before 12 minutes drops temperature rapidly, risking uneven rise and pale tops. Trust the timer—and the aroma. At 13 minutes, your kitchen should smell unmistakably of browned butter and toasted milk solids.
- Altitude Adjustments: Above 3,000 ft? Reduce oven temp by 15–25°F and increase bake time by 1–2 minutes. Lower air pressure accelerates evaporation and surface drying.
- Batch Baking Tip: Bake only one tin at a time on the lowest rack. Stacking or doubling up blocks radiant heat and creates steam pockets, inhibiting crust formation.
- Resist the Refrigerator Temptation: Chilling warm cheesecakes traps steam → rubbery texture and collapsed centers. Patience = perfection.
- Freezing for Longevity: Fully chilled cheesecakes freeze beautifully for up to 3 months. Wrap individually in parchment, then place in airtight freezer bag. Thaw overnight in fridge—never at room temp or microwave.
- Reviving Leftovers: Slightly dried edges? Brush lightly with warmed honey-vanilla syrup (1:1 honey/water + ¼ tsp vanilla) before serving.
Variations and Customizations
While the classic version shines with minimalist elegance, the Mini Burnt Basque Cheesecake is a stunning canvas for creative expression—always respecting its structural integrity and textural soul:
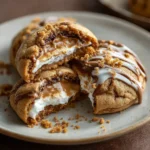
- Chocolate-Dipped: After chilling, dip bottoms ½” into tempered dark chocolate (70% cacao). Chill again until set. Adds crunch, bitterness, and visual drama.
- Matcha Swirl: Whisk 1 tsp high-grade ceremonial matcha with 1 tbsp warm cream until smooth. Drop teaspoonfuls onto batter before baking, then swirl gently with a toothpick—not overmixed.
- Berry Coulis Core: Place ½ tsp seedless raspberry or blackberry coulis in center of each liner before pouring batter. Creates a jewel-toned, tart surprise inside.
- Espresso-Infused: Dissolve 1 tsp instant espresso powder in warm cream before adding to batter. Enhances umami and pairs exquisitely with flaky salt.
- Lavender-Honey: Steep 1 tsp culinary lavender buds in warm cream for 10 minutes, strain, then proceed. Drizzle with local honey before serving.
- Spiced Chai: Infuse cream with 2 chai tea bags (or 1 tbsp loose-leaf chai) for 15 minutes off-heat, then cool and strain. Complements the caramelized notes beautifully.
- Nutty Crust Accent: Press a single toasted almond slice or crushed pistachio onto the top of each unbaked cheesecake—adds textural contrast without compromising purity.
- Smoked Sea Salt Finish: Replace flaky salt with small flakes of smoked Maldon for an intriguing savory-umami whisper.
- White Chocolate–Cardamom: Melt 2 oz white chocolate with ¼ tsp ground cardamom; fold into cooled batter just before filling.
- Vegan Adaptation (Advanced): Use high-fat cashew cream (soaked/blended), coconut cream (full-fat, chilled), silken tofu, and agar-agar as binder—with careful pH balancing and extended chilling. Requires recipe-specific testing.
Pro Tip for Variations: Always test new additions in a 3-cheesecake batch first—flavor infusions and liquids affect bake time, browning, and set. Keep meticulous notes!
Health Considerations and Nutritional Value
A single Mini Burnt Basque Cheesecake (approx. 2.5″ diameter, 65g) contains roughly:
- Calories: 180–210 kcal
- Total Fat: 15–18g (9–11g saturated)
- Carbohydrates: 9–11g (8–10g sugars)
- Protein: 3–4g
- Sodium: 110–140mg (higher if finishing salt is added)
Nutritional Highlights:
- Natural Dairy Nutrition: Provides calcium, vitamin A, riboflavin (B2), and phosphorus—supporting bone health and energy metabolism.
- Conjugated Linoleic Acid (CLA): Naturally occurring in grass-fed dairy fat, CLA may support metabolic health and anti-inflammatory pathways (research ongoing).
- No Artificial Additives: Traditional recipes contain zero preservatives, emulsifiers, or artificial flavors—making them inherently cleaner than many commercial desserts.
Considerations for Mindful Enjoyment:
- Sugar Awareness: While not excessively sweet, the sugar content is moderate. Those managing blood glucose may pair with berries or enjoy as part of a balanced meal rather than standalone snack.
- Saturated Fat Context: Enjoy as an occasional indulgence within overall dietary patterns—not daily. Pairing with fiber-rich fruits (e.g., fresh figs or poached pears) slows glycemic response.
- Lactose Sensitivity: Contains lactose, though baking reduces some content. Lactase enzyme supplements taken prior to consumption may aid digestion for sensitive individuals.
- Gluten-Free Status: Naturally gluten-free—ideal for those with celiac disease or gluten sensitivity (verify all labels, especially vanilla and parchment).
- Portion Control Advantage: The mini format inherently supports mindful eating—offering decadence without excess volume or calories.
Note: Nutritional values vary based on ingredient brands, exact measurements, and bake time. For clinical dietary planning, consult a registered dietitian.
Ingredients
- 16 oz (450g) full-fat brick cream cheese, room temperature
- ¾ cup (150g) granulated sugar
- ¼ tsp fine sea salt
- ⅔ cup (160ml) heavy cream (36–40% fat), room temperature
- ⅓ cup (80g) full-fat sour cream or crème fraîche, room temperature
- 3 large eggs, room temperature
- 2 tsp pure vanilla extract
- Optional: ½ tsp finely microplaned lemon zest
- For serving: Flaky sea salt (e.g., Maldon)
Directions
- Preheat oven to 425°F (220°C) with rack in lowest position. Line a 24-cup standard muffin tin with parchment paper liners (bottom circles + tall sleeves).
- In a large bowl, beat cream cheese with electric mixer on medium-low 1 minute until perfectly smooth. Add sugar and salt; beat 2 minutes until pale and creamy.
- Reduce speed to low. Add sour cream and mix 15 seconds. Slowly stream in heavy cream while mixing; stop as soon as combined.
- Add eggs one at a time, beating 15 seconds after each. After final egg, mix only until yolk disappears (~10 sec). Batter should be thick, glossy, and lump-free. Strain if needed.
- Fold in vanilla (and lemon zest, if using) with spatula—3 gentle turns.
- Fill each liner to ¾ full (~3 tbsp). Tap tin firmly 3x. Smooth tops.
- Bake 14–16 minutes until tops are deeply amber/mahogany, cracked, and fragrant—and centers jiggle softly when nudged.
- Cool in tin 15 minutes. Lift each cheesecake by parchment and cool completely on rack (1–2 hrs).
- Refrigerate uncovered 8–24 hours.
- Peel parchment. Sprinkle with flaky salt. Serve chilled—or rest 10 minutes at room temp for peak creaminess.
FAQ
- Why do my mini cheesecakes crack excessively or collapse?
- Overmixing after eggs, too-rapid cooling, or opening the oven too early. Ensure thorough cream cheese softening, strict low-speed egg integration, and undisturbed cooling. Also verify oven temp—excess heat causes violent puffing and collapse.
- Can I make them ahead for an event?
- Absolutely! They peak at 24–48 hours chilled. Store covered in fridge up to 5 days—or freeze for 3 months. Thaw overnight in fridge.
- My tops aren’t browning—what’s wrong?
- Oven isn’t hot enough (check thermometer), rack too high, or batter too cold. Ensure preheat is full 25+ minutes, rack is lowest, and ingredients are truly room temp.
- Can I use a different pan—like a mini muffin tin or silicone?
- Standard 2.5″ tin is ideal. Mini muffin tins (1.5″) bake too fast—centers set before crust develops. Silicone pans insulate too much, preventing proper charring. Stick with metal + parchment.
- Why does mine taste eggy?
- Eggs were too cold, or batter was overmixed—causing protein overdevelopment. Always use room-temp eggs and minimal mixing post-addition.
- Can I omit the sour cream?
- Not recommended—it’s vital for acidity, tenderness, and moisture balance. Substituting with more cream leads to greasiness and poor set.
- How do I prevent sticking to parchment?
- Use high-quality, unbleached parchment. Don’t grease the parchment—it causes sliding and uneven browning. Ensure sleeves are snug and tall enough to contain rise.
- Are they safe to eat with a jiggly center?
- Yes—intentionally so! The center sets fully during chilling. The “jiggle” indicates perfect doneness; firm centers mean overbaking and dryness.
- Can I double the recipe?
- Yes—but bake one tin at a time. Doubling batter risks overmixing and inconsistent texture. Make separate batches for best results.
- What’s the best way to photograph them?
- Shoot at golden hour with side lighting to highlight crust texture. Garnish with flaky salt and a single fresh berry. Use matte black or slate background for contrast.
Summary
Mini Burnt Basque Cheesecakes are a masterclass in elegant simplicity—transforming humble pantry staples into showstopping, deeply caramelized, cloud-soft desserts through fearless high-heat baking and disciplined technique. Their miniature scale delivers precision, portability, and portion-perfect luxury—making every bite a concentrated celebration of contrast, craftsmanship, and Basque-born brilliance.
With foolproof steps, adaptable variations, and mindful nutritional context, this recipe empowers bakers of all levels to create restaurant-worthy confections at home—where imperfection isn’t a flaw, but the very signature of sublime, burnt-edge beauty.