Introduction
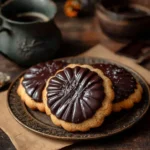
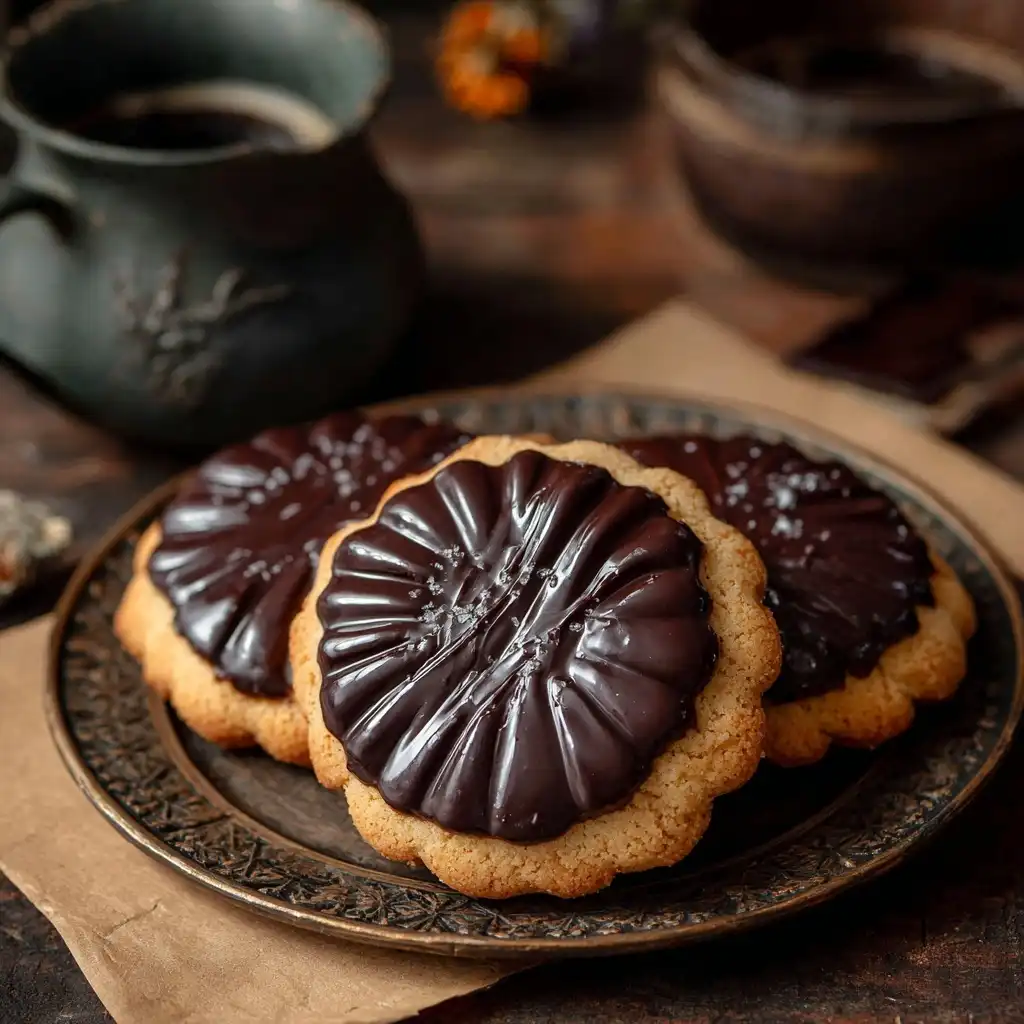
Chocolate Butter Cookies are a beloved classic — rich, tender, deeply chocolatey, and luxuriously buttery all at once. These cookies strike the perfect balance between indulgence and simplicity: no fancy techniques or obscure ingredients required, yet the results feel decadent and bakery-worthy. Whether enjoyed with a tall glass of cold milk, crumbled over vanilla ice cream, or tucked into a lunchbox as a nostalgic treat, Chocolate Butter Cookies evoke warmth, comfort, and timeless appeal. Their versatility makes them ideal for holidays, afternoon tea, gifting, or simply satisfying a spontaneous chocolate craving — and their straightforward preparation ensures even beginner bakers can achieve consistent, crowd-pleasing results.
The History
The origins of Chocolate Butter Cookies trace back to the broader evolution of butter-based drop cookies in late 19th- and early 20th-century America and Europe. As home baking became more accessible with the proliferation of standardized ovens, reliable leavening agents (like baking soda and later baking powder), and commercially milled flours, recipes emphasizing butter’s flavor and texture surged in popularity. Early iterations appeared in community cookbooks and women’s magazines under names like “Butter Drops,” “Chocolate Shorties,” or “Rich Cocoa Cookies.” The iconic version we recognize today — dense yet tender, with a crackled surface and melt-in-your-mouth crumb — was refined throughout the mid-20th century, particularly during the post-war era when cocoa powder became widely available and affordable. Influences from European butter cookie traditions (such as Danish smørdej or Dutch boterkoek) subtly shaped the emphasis on high butter content and minimal leavening. Over decades, home cooks and professional bakers alike elevated the recipe by experimenting with cocoa types, butter temperatures, chilling methods, and mixing techniques — transforming a humble staple into a canvas for culinary expression while preserving its soul: pure, unapologetic butter-chocolate harmony.
Ingredients Breakdown
Every ingredient in Chocolate Butter Cookies plays a precise, functional role — not just for flavor, but for structure, texture, moisture retention, and chemical reaction:
- Unsalted Butter (1 cup / 2 sticks / 227g): The backbone of the cookie. Provides richness, tenderness, and flakiness; its water content creates steam during baking, aiding slight lift, while its fat coats gluten strands to prevent toughness. Unsalted allows full control over sodium levels. Must be softened to ~65°F (18°C) — cool enough to hold shape when creamed but warm enough to blend smoothly without greasiness.
- Granulated Sugar (¾ cup / 150g): Adds sweetness, aids in crispness and caramelization at the edges, and contributes to the signature crackled top through rapid moisture evaporation during baking. Its fine crystals dissolve readily into the butter, helping to aerate the mixture slightly during creaming.
- Packed Brown Sugar (¾ cup / 150g, light or dark): Introduces molasses-derived moisture, acidity (which reacts with baking soda), and deep caramel notes. Dark brown sugar yields a more robust, toffee-like flavor and chewier texture; light brown offers subtler warmth. The “packed” measurement ensures consistency in density and moisture contribution.
- Large Eggs (2, room temperature): Act as emulsifiers, binding fat and water; provide structure via protein coagulation; add moisture and richness. Room temperature eggs incorporate more evenly and reduce risk of re-hardening the butter during mixing.
- Pure Vanilla Extract (2 tsp): Enhances and rounds out chocolate flavor without competing. Alcohol-based extract also helps distribute fat-soluble flavor compounds. Imitation vanilla lacks complexity and can taste artificial under heat.
- All-Purpose Flour (2¼ cups / 280g, spooned & leveled): Supplies gluten-forming proteins for structure. Measured properly (spooned into cup, then leveled — *not* scooped) prevents excess flour, which causes dryness and hardness. A small amount of cornstarch (1–2 tbsp, optional) can be substituted for part of the flour to yield an even more tender, meltaway crumb.
- Natural or Dutch-Process Cocoa Powder (¾ cup / 75g): The heart of the chocolate identity. Natural cocoa is acidic and pairs best with baking soda; Dutch-process is alkalized, milder, and richer in color — it requires baking powder or an acid (like vinegar or buttermilk) for proper rise if used alone. For this recipe, natural unsweetened cocoa is recommended unless otherwise noted for optimal leavening synergy and bright chocolate tang.
- Baking Soda (1 tsp): Reacts with the acidity in brown sugar and natural cocoa to produce carbon dioxide gas — essential for gentle lift, spread control, and that coveted crinkled surface. Too much causes bitterness and metallic aftertaste; too little yields overly dense, flat cookies.
- Fine Sea Salt (1 tsp): Not merely for seasoning — salt heightens sweetness, balances bitterness, strengthens gluten marginally, and amplifies all other flavors. Fine grain ensures even distribution and quick dissolution.
- Mini Semi-Sweet Chocolate Chips (1 cup / 175g) or Chopped Bittersweet Chocolate (6 oz / 170g): Provide melty pockets of contrast, textural interest, and intensified chocolate depth. Mini chips disperse more evenly; chopped bars offer irregular, artisanal pools. High-cocoa-content chocolate (60–70%) delivers superior flavor complexity versus standard chips.
Optional but highly recommended enhancements include a pinch of espresso powder (½ tsp) to deepen chocolate notes without adding coffee flavor, or a dash of flaky sea salt (Maldon or Fleur de Sel) sprinkled on dough balls before baking for a sophisticated sweet-salt finish.
Step-by-Step Recipe
- Prepare Your Workspace: Line two large baking sheets with parchment paper or silicone baking mats. Position oven racks in the upper and lower thirds of the oven. Preheat oven to 350°F (175°C). Allow all ingredients — especially butter and eggs — to reach room temperature (65–70°F / 18–21°C) for at least 45 minutes before beginning. Weigh ingredients using a digital kitchen scale for maximum accuracy and consistency.
- Cream Butter and Sugars: In the bowl of a stand mixer fitted with the paddle attachment (or using a hand mixer in a large bowl), beat softened unsalted butter, granulated sugar, and packed brown sugar on medium speed for 2–3 minutes until light, fluffy, and pale in color. Scrape down the sides and bottom of the bowl halfway through. Proper creaming incorporates air, contributes to spread and texture, and ensures sugars fully dissolve — critical for smooth dough and crackled tops.
- Add Wet Ingredients: Add room-temperature eggs one at a time, beating well after each addition (about 30 seconds per egg) until fully incorporated and glossy. Pause to scrape the bowl. Then beat in vanilla extract until combined. The mixture should look cohesive and slightly thickened — avoid overmixing beyond this stage, which can develop excess gluten.
- Whisk Dry Ingredients: In a separate medium bowl, thoroughly whisk together flour, cocoa powder, baking soda, and fine sea salt. Whisk for at least 30 seconds to ensure even distribution of leavener and salt — clumps of baking soda cause uneven rising and bitter spots.
- Combine Dry and Wet: Reduce mixer speed to low. Gradually add the dry ingredient mixture to the wet mixture in three equal additions, mixing only until *just* combined after each. Do not overmix — streaks of flour are acceptable; the dough will come together fully during the next step. Overmixing develops gluten, leading to tough, cakey cookies instead of tender, buttery ones.
- Fold in Chocolate: Using a flexible silicone spatula, gently fold in mini chocolate chips or chopped chocolate until evenly distributed. Take care not to crush chips or overwork the dough.
- Chill the Dough (Non-Negotiable Step): Cover the bowl tightly with plastic wrap and refrigerate for *at least 2 hours*, preferably 3–4 hours, or up to 72 hours. Chilling solidifies the butter, preventing excessive spread; hydrates the flour and cocoa for improved flavor development; and relaxes gluten for optimal tenderness. For best results, scoop dough *before* chilling: use a 1.5-tablespoon (or #40) cookie scoop to portion 1.5-inch balls onto parchment-lined trays, then chill — this saves time and ensures uniform size.
- Portion and Prep for Baking: If chilled in bulk, scoop chilled dough using the same #40 scoop. Roll each portion lightly between palms to smooth and compact slightly (this encourages even spreading and defined edges). Place dough balls at least 3 inches apart on prepared baking sheets. Optional: Sprinkle the tops with a tiny pinch (⅛ tsp) of flaky sea salt for gourmet contrast.
- Bake Strategically: Bake one sheet at a time on the center rack for 11–13 minutes. Rotate the sheet halfway through for even browning. Cookies are done when the edges are set and lightly golden, the centers look soft and slightly puffed, and the surface is deeply cracked — they will appear underbaked but will continue to set as they cool. Avoid overbaking; even 30 extra seconds can dry them out.
- Cool Completely: Let cookies cool on the baking sheet for 5 minutes — this allows residual heat to finish setting the structure. Then carefully transfer to a wire rack using a thin spatula and cool completely (at least 20 minutes) before serving. This step is essential: cutting or biting too soon releases steam and compromises texture, resulting in crumbliness rather than that signature tender-yet-cohesive bite.
Tips
- Butter Temperature Mastery: Ideal softened butter yields to gentle pressure with your finger, leaving a clean indentation without greasy residue or crumbling. If butter is too warm, refrigerate the bowl for 10–15 minutes before creaming. If too cold, cut into small cubes and let sit at room temp for 10 minutes — never microwave.
- Measure Flour Correctly: Use the “spoon-and-level” method religiously: fluff flour in its container with a spoon, gently spoon into measuring cup until overflowing, then level off with straight edge. Scooping directly compresses flour and adds up to 25% more — guaranteeing dry, dense cookies.
- Chill Time Is Flavor Time: Extended chilling (up to 3 days) doesn’t just prevent spread — it allows cocoa and brown sugar flavors to meld and deepen significantly. Many bakers report richer, more nuanced chocolate notes after 48+ hours.
- Rotate & Swap Racks: If baking two sheets simultaneously, swap their positions (top ↔ bottom) and rotate each ½ turn halfway through. This compensates for oven hot spots and ensures uniform browning.
- Use an Oven Thermometer: Most home ovens run inaccurately. An inexpensive oven thermometer confirms your actual baking temperature — critical since even 25°F variance affects spread, set time, and browning.
- Don’t Skip the Salt Sprinkle: A micro-sprinkle of flaky sea salt applied *immediately after baking* (while cookies are still hot) adheres perfectly and delivers a burst of salinity that makes the chocolate sing.
- Cooling Surface Matters: Always cool on a wire rack — not a countertop or folded towel. Trapped steam underneath leads to soggy bottoms and loss of crisp edges.
- Freeze for Freshness: Portion unbaked dough balls onto a tray, freeze solid (1 hour), then transfer to a freezer bag. Bake straight from frozen — add 1–2 minutes to bake time. Frozen dough keeps for up to 3 months with zero quality loss.
- Resist the Press: Never flatten dough balls before baking. Their round, domed shape promotes even heat penetration and that beautiful crinkled crown. Flattening encourages irregular spread and thinner, crispier edges.
- Batch Consistency: Keep dough chilled between batches. Warm dough spreads excessively. Return sheet to fridge for 5 minutes if dough softens while prepping next batch.
Variations and Customizations
Chocolate Butter Cookies serve as an endlessly adaptable foundation — here are inspired, tested variations that maintain structural integrity while introducing exciting new dimensions:
- Espresso-Chocolate Swirl: Dissolve 1½ tsp instant espresso powder in 1 tsp hot water; cool completely. Add to batter with vanilla. Optional: Swirl in 2 tbsp cooled, melted dark chocolate using a toothpick for marbled elegance.
- Peanut Butter Cup: Fold in ½ cup roasted, salted peanut butter chips + ¼ cup chopped salted peanuts. Optional: Press a whole miniature peanut butter cup into the center of each dough ball before baking.
- Orange-Zest & Dark Chocolate: Add 2 tsp finely grated orange zest + 1 tsp orange extract with the vanilla. Substitute bittersweet chocolate (70%) for semi-sweet chips.
- Spiced Mexican Hot Chocolate: Add 1 tsp ground cinnamon, ¼ tsp ground chipotle powder, and a pinch of cayenne with dry ingredients. Top with coarse demerara sugar before baking.
- White Chocolate–Raspberry: Replace semi-sweet chips with high-quality white chocolate chips and fold in ⅔ cup freeze-dried raspberries (pulverized into dust + whole pieces) — adds bright acidity and jewel-toned speckles.
- Oatmeal Chocolate Butter: Reduce flour to 1¾ cups and add 1 cup old-fashioned rolled oats (not instant or quick oats). Soak oats in 2 tbsp milk for 10 minutes before folding in for plump, chewy texture.
- Gluten-Free Adaptation: Substitute 2¼ cups (280g) certified gluten-free all-purpose flour blend containing xanthan gum (e.g., Bob’s Red Mill 1-to-1 or King Arthur Measure for Measure). Increase chilling time to 4 hours minimum — GF dough benefits from extra hydration absorption.
- Vegan Version: Use vegan butter (Miyoko’s or Earth Balance sticks), flax eggs (2 tbsp ground flax + 6 tbsp water, rested 10 min), dairy-free chocolate, and ensure cocoa is vegan-certified. Chill dough 4+ hours — vegan fats behave differently and require longer firming.
- Stout-Infused: Replace 2 tbsp of the egg liquid with room-temp, reduced stout beer (simmer ¼ cup stout until reduced to 2 tbsp). Adds malty depth and subtle bitterness that complements cocoa beautifully.
- Cookie Sandwiches: Bake cookies 1–2 minutes less for extra soft centers. Once cooled, pipe or spread a luxurious filling (vanilla bean buttercream, salted caramel, or mascarpone-chocolate ganache) between two cookies. Roll edges in crushed toasted hazelnuts or cocoa nibs.
Health Considerations and Nutritional Value
While Chocolate Butter Cookies are inherently indulgent, mindful ingredient choices and portion awareness allow for thoughtful enjoyment within a balanced diet. Per standard 2.5-inch cookie (recipe yields ~36 cookies):
- Calories: ~180–210 kcal — primarily from complex carbohydrates (flour, sugars) and healthy fats (butter, cocoa butter).
- Fat: ~10–12g total fat, with ~6–7g saturated fat (from butter and chocolate). Butter contains beneficial fat-soluble vitamins (A, D, E, K2) and butyrate, linked to gut health. Opting for grass-fed butter increases omega-3s and CLA.
- Carbohydrates: ~22–25g, including 16–18g naturally occurring sugars (brown sugar, milk solids in chocolate) and 1–2g dietary fiber (from cocoa powder and optional additions like oats or nuts).
- Protein: ~2–3g — modest but contributes to satiety.
- Micronutrients: Cocoa powder is rich in flavonoid antioxidants (epicatechin, procyanidins), associated with improved vascular function and reduced inflammation. It also provides iron, magnesium (supports muscle/nerve function), and copper. Dark chocolate (70%+) boosts these benefits significantly.
Considerations for Health-Conscious Bakers:
- Sugar Reduction: Reduce granulated sugar to ½ cup without compromising structure; brown sugar provides necessary moisture and acidity. Avoid sugar substitutes like erythritol or stevia in baking — they inhibit browning, cause grittiness, and lack caramelizing properties.
- Butter Alternatives: Ghee (clarified butter) offers lactose-free richness and higher smoke point. For plant-based needs, avocado oil or high-oleic sunflower oil (¼ cup) can replace half the butter — though texture becomes more cakey and less tender.
- Enrichment Options: Add 2 tbsp ground flaxseed or chia seeds for omega-3s and fiber. Stir in ¼ cup chopped walnuts or almonds for vitamin E, magnesium, and crunch.
- Portion Control: Use a #60 scoop (1 tbsp) for smaller, 120-calorie cookies — perfect for mindful snacking or school lunches.
- Not Low-Carb/Keto-Friendly: Due to flour and sugar content. For keto versions, explore almond flour/coconut flour blends with erythritol and sugar-free chocolate — but note these yield distinctly different textures and are outside the scope of traditional Chocolate Butter Cookies.
Ultimately, these cookies align with the principles of intuitive eating — honoring hunger and satisfaction cues. Enjoying them deliberately, slowly, and without guilt supports long-term wellness far more effectively than restriction or substitution gimmicks.
Ingredients
- 1 cup (227g / 2 sticks) unsalted butter, softened to 65°F (18°C)
- ¾ cup (150g) granulated sugar
- ¾ cup (150g) packed light or dark brown sugar
- 2 large eggs, room temperature
- 2 teaspoons pure vanilla extract
- 2¼ cups (280g) all-purpose flour, spooned & leveled
- ¾ cup (75g) natural unsweetened cocoa powder (not Dutch-process unless adjusting leavener)
- 1 teaspoon baking soda
- 1 teaspoon fine sea salt
- 1 cup (175g) mini semi-sweet chocolate chips or 6 oz (170g) high-quality bittersweet chocolate, finely chopped
- Optional: ½ teaspoon espresso powder, dissolved in ½ tsp hot water and cooled; flaky sea salt for topping
Directions
- Preheat oven to 350°F (175°C). Line two large baking sheets with parchment paper or silicone mats.
- In the bowl of a stand mixer fitted with paddle attachment, beat softened butter, granulated sugar, and brown sugar on medium speed for 2–3 minutes until light, fluffy, and pale. Scrape bowl.
- Add eggs one at a time, beating well (≈30 sec) after each. Beat in vanilla (and cooled espresso mixture, if using) until combined.
- In a separate bowl, whisk together flour, cocoa powder, baking soda, and salt for 30 seconds to fully combine.
- With mixer on low, gradually add dry ingredients in three parts, mixing only until no dry streaks remain. Do not overmix.
- Fold in chocolate chips or chopped chocolate with a silicone spatula until evenly dispersed.
- Cover bowl tightly with plastic wrap and refrigerate dough for at least 2 hours, ideally 3–4 hours or up to 3 days.
- When ready to bake, scoop chilled dough using a #40 cookie scoop (1.5 tbsp) into 1.5-inch balls. Roll gently between palms, place 3 inches apart on prepared sheets, and optionally sprinkle tops with flaky sea salt.
- Bake one sheet at a time on center rack for 11–13 minutes, rotating halfway, until edges are set and golden and centers look soft with pronounced cracks.
- Cool cookies on sheet for 5 minutes, then transfer to wire rack to cool completely before serving (minimum 20 minutes).
FAQ
- Can I use Dutch-process cocoa?
- Yes — but you must replace the 1 tsp baking soda with 1¼ tsp baking powder to ensure proper leavening, as Dutch-process cocoa lacks the acidity needed to activate soda. Expect a deeper, smoother chocolate profile and slightly darker color.
- Why did my cookies spread too much?
- Most common causes: butter too warm, insufficient chilling time, excess flour not measured correctly (too little), or expired baking soda. Also check oven temperature — a too-cool oven delays set time, allowing prolonged spread.
- Can I make these gluten-free?
- Absolutely — use 2¼ cups (280g) of a trusted 1:1 gluten-free flour blend *with xanthan gum included*. Increase chill time to 4 hours, and expect slightly more delicate, crumbly texture. Do not substitute single GF flours (e.g., almond or coconut) — they lack binding structure.
- How do I store them?
- Cool completely, then store in an airtight container at room temperature for up to 1 week. For longer freshness, freeze baked cookies in layers separated by parchment for up to 3 months — thaw at room temp or warm briefly in oven.
- Can I double the recipe?
- Yes — but mix in two separate batches to ensure proper creaming and even incorporation. Doubling in one bowl risks undermixing or overheating the butter.
- My cookies turned out cakey — what went wrong?
- Overmixing after adding flour is the #1 culprit. Mixing >30 seconds on medium-low after dry ingredients are added develops gluten. Also verify your baking soda isn’t expired — flat, dense cookies often indicate inactive leavener.
- Can I add nuts?
- Yes! Fold in ¾ cup toasted walnuts, pecans, or hazelnuts with the chocolate. Toasting enhances flavor and crunch — skip raw nuts, which can turn bitter when baked.
- Are these suitable for mailing or gifting?
- Excellent choice! Their sturdy, non-fragile texture holds up well. Layer between parchment in a rigid tin or box. Include a slice of apple or bread to retain moisture during transit (replace every 2 days).
- Can I use salted butter?
- You can — but omit the added 1 tsp fine sea salt entirely, and taste dough before baking to adjust. Salted butter varies widely in sodium content, so precision is harder to achieve.
- What’s the best chocolate to use?
- For premium results: Valrhona Caraïbe (66%), Callebaut 60% Couverture, or Ghirardelli Bittersweet Baking Bars. Avoid chocolate chips labeled “baking chips” with stabilizers — they resist melting and create waxy pockets.
Summary
Chocolate Butter Cookies are the quintessential marriage of velvety cocoa, creamy butter, and balanced sweetness — yielding irresistibly tender, deeply flavored treats with a signature crinkled top and chewy-yet-melting crumb.
Mastered through precise ingredient ratios, disciplined chilling, and mindful baking technique, they’re endlessly customizable, nostalgically comforting, and worthy of both everyday joy and special-occasion celebration.