Introduction
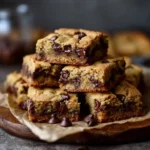
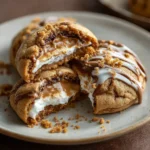
Indulge in the rich, complex, and deeply aromatic world of Brown Butter Chocolate Chip Cookie Bars — a decadent hybrid that marries the chewy, buttery soul of classic chocolate chip cookies with the effortless elegance and portion-perfect convenience of bar cookies. Unlike traditional drop cookies, these bars deliver uniform thickness, consistent browning, and an intensified flavor profile thanks to one transformative technique: browning the butter. The result is a golden-brown, nutty, caramel-kissed base studded with generous pockets of gooey, melty chocolate — crisp at the edges, tender-chewy in the center, and impossibly fragrant with toasted dairy notes. Whether you’re baking for a school bake sale, prepping dessert for a dinner party, meal-prepping sweet treats for the week, or simply craving something profoundly comforting, these bars satisfy on every level: texturally, aromatically, and emotionally.
The History
The evolution of the Brown Butter Chocolate Chip Cookie Bar is a delicious case study in culinary cross-pollination. Its roots stretch back to the 1930s with Ruth Wakefield’s iconic Toll House Chocolate Chip Cookie — a serendipitous invention born from a shortage of baker’s chocolate and a clever substitution of semi-sweet morsels. As home bakers sought easier, more scalable alternatives to drop cookies, bar-style adaptations began appearing in mid-century community cookbooks and women’s magazines — often labeled “cookie squares” or “oven bars.” The pivotal innovation of browning butter, however, has far older origins: a foundational French technique (beurre noisette) used since at least the 17th century to elevate sauces, pastries, and confections. It wasn’t until the late 20th and early 21st centuries — fueled by food blogs, viral baking videos, and a growing obsession with depth-of-flavor — that browning butter entered mainstream American cookie culture. Pioneering bakers like Dorie Greenspan and Stella Parks championed its use in chocolate chip cookies, and soon, recipe developers began adapting those nuanced, toasty formulas into bar form. Today, brown butter chocolate chip cookie bars represent the perfect convergence of nostalgic Americana and refined, technique-driven baking — a testament to how a single, mindful step (browning the butter just right) can redefine an entire category.
Ingredients Breakdown
Every ingredient in this recipe plays a precise, science-backed role — not just for flavor, but for structure, texture, moisture retention, and chemical reaction:
- Unsalted Butter (1 cup / 2 sticks / 227g): Unsalted is essential for flavor control and consistency. Browning transforms its milk solids into deeply flavorful, aromatic compounds (diacetyl, furans, and pyrazines), while removing water improves dough cohesion and reduces spread. The residual nutty solids add complexity and richness that regular melted or softened butter simply cannot replicate.
- Brown Sugar (1 cup packed / 220g): A blend of molasses and sucrose, brown sugar contributes moisture, acidity (which activates baking soda), and caramel notes that harmonize with browned butter. Dark brown sugar intensifies both color and molasses depth; light brown yields a milder, more balanced sweetness.
- Granulated Sugar (½ cup / 100g): Provides structural integrity and crispness. Its lower moisture content and neutral pH help create lift and edge definition, counterbalancing the softening effect of brown sugar.
- Large Eggs (2, room temperature): Act as emulsifiers, binders, and leavening agents. Room temperature ensures even incorporation and prevents re-solidification of warm brown butter. The yolks add fat and richness; the whites contribute structure and slight chew.
- Pure Vanilla Extract (2 tsp): Not optional — high-quality vanilla amplifies the butter’s nuttiness and rounds out chocolate’s bitterness. Alcohol-based extract also helps distribute fat-soluble flavor compounds evenly.
- All-Purpose Flour (2 ¼ cups / 280g, spooned & leveled): The structural backbone. Spooning and leveling prevents compaction and over-measuring — a common cause of dry, cakey bars. For optimal chew, avoid bread flour (too much gluten) or cake flour (too little structure).
- Baking Soda (1 tsp): A fast-acting alkali that reacts with the acidity in brown sugar and browned butter’s lactic acid to produce carbon dioxide bubbles — crucial for lift, tenderness, and that signature crackled surface.
- Fine Sea Salt (1 tsp + pinch for garnish): Enhances all other flavors, balances sweetness, and tempers bitterness. Fine salt dissolves completely; coarse varieties may leave uneven seasoning.
- Chocolate Chips or Chunks (2 cups / 340g): Use high-quality 60–70% dark chocolate chunks for superior melt and depth, or a mix of semi-sweet and bittersweet chips for complexity. Avoid “baking chips” with added waxes — they resist melting and yield grainy texture. Chop your own chocolate bars for irregular, bakery-style pools.
- Optional Additions: Flaky sea salt (Maldon or Jacobsen) sprinkled atop before baking enhances contrast; toasted walnuts or pecans (¾ cup, chopped) add crunch and earthiness; a tablespoon of instant espresso powder deepens chocolate flavor without adding bitterness.
Step-by-Step Recipe
- Brown the Butter (Critical First Step): Place unsalted butter in a light-colored, heavy-bottomed saucepan (stainless steel preferred for visibility). Melt over medium-low heat, stirring constantly with a silicone spatula. Once melted, continue cooking as the butter foams, then subsides. Watch closely as the milk solids sink and turn golden amber — about 5–8 minutes total. You’ll smell a rich, nutty, toasty aroma (like roasted hazelnuts and caramel). Immediately remove from heat and pour into a heatproof bowl, scraping all browned bits. Let cool to warm (about 10–15 minutes) — it should be fluid but no longer hot to the touch. Do not skip cooling — overheated butter will scramble eggs.
- Whisk Wet Ingredients: In a large mixing bowl, whisk together the cooled brown butter, brown sugar, and granulated sugar until fully combined and slightly glossy — about 1 minute. Add eggs one at a time, whisking vigorously for 30 seconds after each addition until thickened and pale. Whisk in vanilla until fully incorporated.
- Dry Ingredients & Folding: In a separate bowl, whisk together flour, baking soda, and salt. Gradually add the dry mixture to the wet ingredients in two additions, folding gently with a spatula just until no dry streaks remain — do not overmix. Overmixing develops gluten, leading to tough, dense bars. Fold in chocolate chips (and nuts, if using) until evenly distributed.
- Prepare Pan & Batter Transfer: Line a 9×13-inch metal baking pan with parchment paper, leaving 2-inch overhangs on two opposite sides for easy lifting. Lightly grease the parchment. Scrape batter into the pan and use an offset spatula or greased bench scraper to spread evenly, pressing firmly into corners. Smooth the top. Optional: Sprinkle with flaky sea salt and/or a few extra chocolate chunks.
- Chill (Highly Recommended): Refrigerate uncovered for at least 1 hour (up to 72 hours). Chilling solidifies the butter, slows spread, concentrates flavor, and allows gluten to relax — resulting in thicker, chewier, more uniformly baked bars with defined edges.
- Bake to Perfection: Preheat oven to 350°F (177°C) with rack in center position. Bake chilled batter for 28–34 minutes — timing varies by oven and pan material. Bars are done when edges are deeply golden and set, the center is puffed and just beginning to pull away from the pan sides, and a toothpick inserted 1 inch from the edge comes out with moist crumbs (not wet batter). The center will look slightly underdone — it continues to set as it cools.
- Cool Completely Before Cutting: Let bars cool in the pan on a wire rack for 2 hours minimum — ideally 3–4 hours or overnight. This allows steam to escape, starches to set, and fats to re-solidify, ensuring clean, sliceable bars with ideal chew. Cutting too soon yields crumbly, sticky results.
- Storage & Serving: Lift parchment overhangs to remove slab. Cut into 16–24 bars using a sharp, hot knife (dip blade in hot water and wipe dry between cuts). Store at room temperature in an airtight container for up to 5 days, or freeze unfrosted bars for up to 3 months.
Tips
- Butter Browning Mastery: Use a light-colored pan to monitor color changes. Swirl, don’t stir, during the final 60 seconds for even browning. If butter smokes or smells acrid, it’s burnt — discard and start over. Save every bit of the browned milk solids — they’re where the magic lives.
- Temperature Is Everything: Ensure brown butter is warm, not hot (~110°F/43°C max) before adding eggs. Warm eggs prevent thermal shock and ensure smooth emulsion.
- Pan Matters: Use a shiny aluminum 9×13-inch pan — dark or nonstick pans absorb more heat and cause over-browning on edges. Glass or ceramic pans require reducing oven temp by 25°F and adding 3–5 minutes to bake time.
- Chilling Is Non-Negotiable: Skipping the chill leads to thin, greasy, overly spread bars. For ultra-thick, bakery-style bars, chill overnight and bake straight from fridge.
- Know Your Oven: Use an oven thermometer — many ovens run hot or cold. Rotate pan halfway through baking only if your oven has hot spots (test first with toast).
- Cutting Technique: For clean edges, chill fully-cut bars for 15 minutes before serving. A pizza cutter works surprisingly well for quick, even slices.
- Flavor Blooming: For maximum depth, let the batter rest in the fridge for 24–48 hours before baking — flavor compounds meld and intensify dramatically.
- Don’t Overbake: Remove bars when the center still looks soft — carryover heat will finish them. Err on the side of underdone; overbaked bars become dry and crumbly.
Variations and Customizations
This versatile base invites endless creativity — all while preserving the signature brown butter foundation:
- Double Chocolate: Replace ¼ cup of flour with unsweetened cocoa powder (Dutch-process preferred) and fold in ½ cup mini chocolate chips for extra fudginess.
- White Chocolate & Macadamia: Swap chocolate chips for high-quality white chocolate chunks and toasted macadamia nuts. Add 1 tsp coconut extract for tropical nuance.
- Oatmeal Brown Butter: Reduce flour to 1 ¾ cups and add 1 cup old-fashioned rolled oats (not quick oats). Toast oats lightly before adding for enhanced nuttiness.
- Espresso Crunch: Stir 1 tbsp instant espresso powder into warm brown butter. Fold in 1 cup toffee bits and ½ cup chopped dark chocolate.
- Gluten-Free: Substitute a 1:1 gluten-free all-purpose flour blend (with xanthan gum included) and add ½ tsp xanthan gum if not present. Increase chill time to 2 hours for optimal structure.
- Vegan Adaptation: Use vegan butter (high-fat, European-style), flax eggs (2 tbsp ground flax + 5 tbsp water, rested 10 min), and vegan chocolate. Add 1 tsp apple cider vinegar to react with baking soda for lift.
- Mini Bar Bites: Press batter into a lined 8×8-inch pan and bake 22–26 minutes. Or use a mini muffin tin (sprayed well) for individual portions — bake 12–15 minutes.
- Gourmet Finish: Drizzle cooled bars with dark chocolate ganache, sprinkle with edible gold dust, or top with a swipe of salted caramel sauce before serving.
Health Considerations and Nutritional Value
While undeniably indulgent, these bars can be contextualized within a balanced diet when enjoyed mindfully. Per standard 2″ × 2″ bar (recipe yields ~20), approximate values are: Calories: 225 | Total Fat: 13g (8g saturated) | Carbohydrates: 26g (19g sugars) | Protein: 2g | Fiber: 0.5g | Sodium: 145mg. Key considerations include:
- Sugar Awareness: Contains both naturally occurring sugars (milk solids) and added sugars (brown/granulated). To reduce, substitute ¼ cup of granulated sugar with monk fruit or erythritol blends — though texture and browning may vary slightly.
- Butter Quality: Choose grass-fed butter when possible — higher in conjugated linoleic acid (CLA) and omega-3s. Brown butter’s Maillard reaction does not create harmful compounds at typical baking temps (<350°F).
- Chocolate Benefits: Dark chocolate (>70%) contributes flavonoids and antioxidants. Opting for high-cocoa chocolate increases polyphenol content while lowering sugar load.
- Portion Control: The bar format inherently supports mindful eating — pre-portioned servings prevent mindless snacking. Pair with Greek yogurt or berries for added protein/fiber.
- Allergen Notes: Contains dairy, wheat/gluten, and eggs. Tree nuts (if added) are a top-8 allergen. Always label clearly for guests or school settings.
- Not a Health Food — But Not “Junk” Either: Real ingredients, zero artificial preservatives or hydrogenated oils, and nutrient-dense fats make these a far superior choice to commercially processed snack bars loaded with emulsifiers and corn syrup.
Ingredients
- 1 cup (2 sticks / 227g) unsalted butter
- 1 cup (220g) packed light or dark brown sugar
- ½ cup (100g) granulated sugar
- 2 large eggs, room temperature
- 2 teaspoons pure vanilla extract
- 2 ¼ cups (280g) all-purpose flour, spooned and leveled
- 1 teaspoon baking soda
- 1 teaspoon fine sea salt, plus flaky sea salt for garnish
- 2 cups (340g) high-quality chocolate chips or chopped chocolate (semi-sweet, bittersweet, or dark)
- Optional: ¾ cup toasted walnuts or pecans, 1 tbsp instant espresso powder, 1 tsp cinnamon
Directions
- Preheat oven to 350°F (177°C). Line a 9×13-inch metal baking pan with parchment paper, leaving overhangs on two opposite sides. Lightly grease parchment.
- In a light-colored, heavy-bottomed saucepan, melt butter over medium-low heat. Continue cooking, swirling constantly, until butter foams, subsides, and milk solids turn golden amber (5–8 minutes). Immediately pour into a heatproof bowl, scraping all browned bits. Cool to warm (10–15 minutes).
- In a large bowl, whisk warm brown butter, brown sugar, and granulated sugar until combined. Whisk in eggs one at a time, then vanilla, until thickened and pale.
- In another bowl, whisk together flour, baking soda, and salt. Gradually fold into wet ingredients until just combined. Fold in chocolate (and nuts/espresso if using).
- Scrape batter into prepared pan. Spread evenly and press firmly into corners. Smooth top. Sprinkle with flaky sea salt and extra chocolate if desired.
- Refrigerate uncovered for at least 1 hour (up to 72 hours).
- Bake for 28–34 minutes, until edges are deeply golden and set, center is puffed and just pulling from sides, and toothpick near edge shows moist crumbs.
- Cool completely in pan on wire rack (minimum 2 hours, ideally 3–4 hours or overnight).
- Lift out using parchment overhangs. Cut into bars with sharp, hot knife. Serve at room temperature.
FAQ
- Can I use salted butter?
- No — salted butter contains variable sodium levels that interfere with precise seasoning. Use unsalted butter and add controlled salt for consistent results.
- Why did my bars spread too much?
- Likely causes: butter was too warm when adding eggs, skipped chilling step, used dark/nonstick pan, overmixed batter, or measured flour incorrectly (scooping vs. spooning). Always chill!
- Can I make these ahead?
- Absolutely! Batter keeps refrigerated for up to 3 days or frozen (unbaked) for 3 months. Thaw overnight in fridge before baking. Baked bars freeze beautifully for up to 3 months — thaw at room temperature.
- What if I don’t have a light-colored pan for browning butter?
- You can use any heavy-bottomed pan, but rely heavily on smell and sound: nutty aroma and gentle popping indicate readiness. A digital thermometer reading 250–260°F (121–127°C) is ideal.
- Can I double the recipe?
- Yes — bake in two 9×13-inch pans simultaneously on center and upper-middle oven racks. Rotate pans top-to-bottom and front-to-back halfway through baking.
- Why are my bars cakey instead of chewy?
- Overmixing, too much flour, expired baking soda, or overbaking are primary culprits. Also ensure you’re using brown sugar (not just granulated) — its acidity and moisture are vital for chew.
- Can I use margarine or oil?
- No — neither browns nor provides the same fat structure. Margarine contains water and stabilizers that inhibit proper browning and texture. Stick to real butter.
- How do I get that gorgeous crackled top?
- Key factors: proper ratio of brown to granulated sugar, adequate chilling, correct oven temp, and avoiding overmixing. The crackle forms as the surface dries and sets while interior rises.
Summary
Brown Butter Chocolate Chip Cookie Bars are the ultimate elevated comfort dessert — transforming humble pantry staples through the alchemy of browned butter into deeply aromatic, golden-edged, tender-chewy bars studded with molten chocolate.
With meticulous attention to temperature, timing, and technique — especially browning the butter to nutty perfection and chilling the batter thoroughly — these bars deliver restaurant-worthy depth, texture, and nostalgia in every single, shareable square.